Upon request, this post is about Panquecas. Yes, the word should sound very familiar to you, recalling those stacked, warm, fluffy concoctions topped with a good dab of butter and a drizzle of maple syrup you sometimes have for breakfast. But, apart from the fact that the batter uses similar ingredients - such as eggs, milk, and flour - the analogies between Brazilian panquecas and American pancakes stop there, as you can see from this picture:

There are many good things about panquecas, although one might find the preparation of the dough a little tricky and time consuming. But once you master this stage, you are ready to prepare your own assortment of panquecas, because the filling is what really gives them a character. In this sense, they are a good way to use meat, chicken and/or vegetables leftovers. Another good thing is that panquecas can be prepared way in advance and just reheated before serving. They freeze very well too - just remember to transfer the dish to the fridge the night before. As a matter of fact, they can also be successfully reheated in the microwave oven, the only downside being the fact that the cheese will not be as golden brown and the dough won’t get crispy on the edges.
Panquecas are a stand-alone dish, but can also be served with rice (and beans) and salad. If you want them to look fancier, prepare the discs in a larger frying pan and, instead of rolling up with filling, make little bundles, tied with a green scallion leaf or parsley stem wilted in the stove flame. You can then spoon some tomato or other sauce or coulis on a plate and place the trouxinha (Portuguese word for little bundle) in the center. Or use the dough as layers to build a savory cake with any filling you like. Another way to make them look different (and more nutritious) is to add herbs (such as parsley, basil and cilantro), cooked and squeezed spinach, powdered carrot and/or beet, paprika etc. to the batter. The only thing you will need to do, then, is to adjust the consistency. But you’ll have to do it anyway, as different flour batches and egg sizes will produce different batter consistencies.
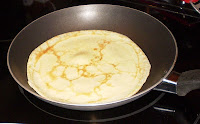
The only way to adjust the consistency of the batter is by trial and error. The dough should be liquid enough to spread all over the frying pan as you twirl it before starting to set, but not so thin that you have big holes and/or a mushy, creamy final product that falls apart. Adjust it by adding more milk or flour to the batter, little by little. The next picture shows the first panqueca I prepared with my batter - you can see that there is a yellowish layer in the middle that started setting before I was able to spread it onto the pan, making the dough a little too thick. I added a tad more milk to the mixer cup and the next one turned out ok.
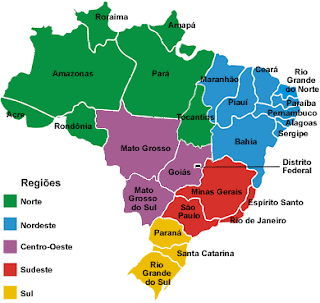
Lastly, I have to say a word about the “authenticity” of panquecas as a Brazilian national dish. Most Brazilians would never remember to mention panquecas as a “Brazilian” dish; some would even strongly disagree with this “upgrade” I propose here. But, hey, although they sure are a French legacy, the way Brazilians got hold of them and developed all sorts of new manners to prepare them is, sure, unique! And, as far as I know, panquecas are served all over Brazil.
I hope you too become a fan of them - as Nina and Kristin already are! After all, imagination is the only limitation to how you can prepare them.
Panquecas de frango
(Chicken panquecas)
Panquecas de frango
(Chicken panquecas)
Filling:
2 boneless chicken breasts halves, or 2 leg quarters, or any combination of dark/white meat you like
1/2 tsp colorau or powdered annatto seed (optional)
1/2 tsp white wine or cider vinegar
1 Tbsp thinly sliced onion
1 tsp oil
salt and freshly ground black pepper to taste
1 Tbsp vegetable oil
1/3 cup finely chopped onion
2 garlic cloves, minced
1 tsp tomato paste
1 cup shredded carrots (about 2 medium)
1/2 cup corn kernels, frozen or canned (drained)
1/2 cup green peas, fresh or frozen
3/4 cup shredded zucchini (1 small, optional)
1/2 cup chopped tomatoes
salt and freshly ground black pepper, to taste
1. Season chicken with salt, pepper, annatto powder, vinegar, onion and 1/2 tsp oil. Let sit for at least 30 minutes, or overnight. (You can also season the chicken with salt and pepper only right before cooking, but you’ll need to season the refogado very well to compensate for that.)
2. Heat remaining 1/2 tsp oil in a saucepan or pressure cooker and add chicken. Sear until golden brown on all sides.
3. Add enough water to cover the meat and cook on low heat until very tender (15 minutes in the pressure cooker; about 35 minutes in a regular pan, partially covered). Add more water if necessary.
4. Remove chicken from pan, reserving the broth, and shred the meat.
5. Heat 1 Tbsp oil in a saucepan, add onion and fry until translucent. Add garlic and fry until golden brown. Add tomato paste and fry for a few seconds, just to mix it with well with the other ingredients in the pan.
6. Add carrots, corn, peas, and zucchini and refogue on high heat for about 5 minutes, stirring every now and then.
7. Add chopped tomatoes and shredded chicken and cook, on medium heat, partially covered, until vegetables are tender and tomato is almost dissolved (about 10 minutes). Add reserved chicken broth as needed - there should be plenty of moisture in the filling, but it should not be watery or runny.
Batter:
1/2 cup whole milk
1 Tbsp butter, melted
2 large eggs
1/4 tsp salt
6-7 Tbsp all-purpose flour
vegetable oil for frying
1. Combine all ingredients in a blender until well mixed.
2. Heat a drizzle of vegetable oil in a 8-10 inch non-stick frying pan over medium heat. Add about 1/8 of the batter to the hot pan (1/8 of a cup, approximately) in a steady stream, twirling the pan in the air as you pour to spread the batter evenly on the bottom of the pan.
3. Cook until the sides begin to curl up and the bottom is golden brown. Flip over and cook the other side until golden brown.
4. Repeat procedure, stacking the discs as you go, until all the batter has been used (you should have 6 to 8 panquecas, depending on the size of your frying pan).
Tomato sauce:
1 Tbsp olive oil
2 Tbsp finely chopped onion
2 garlic cloves, minced
1 16-oz can crushed tomatoes, or 4 ripe tomatoes, very finely chopped
1/3-1/2 cup chicken broth
2 Tbsp chopped flat-leaf parsley
salt and freshly ground black pepper to taste
1. Heat olive oil in a saucepan. Add onion and fry until translucent. Add garlic and fry until golden brown. Add canned or chopped tomatoes, 1/3 cup chicken broth, salt and pepper to taste.
2. Cover the pan and cook, on medium heat, for about 15 minutes, stirring every now and then. Add more chicken broth, if necessary - the sauce should be thick enough just to stay on top of panquecas, not more.
3. Turn off heat and add chopped parsley.
Assembling:
2 Tbsp grated parmesan cheese
- prepared panqueca dough
- prepared filling
- prepared sauce
1. Depending on the serving size you want (bigger for stand-alone entrées, smaller when served with side dishes and/or a salad), divide the filling among panqueca discs and roll them up.
2. Place cylinders side by side on an oiled baking dish, or arrange them on serving plates (oven proof, if you’re going to reheat them) and pour some tomato sauce along the center, crosswise.
3. Sprinkle with parmesan cheese and bake on preheat oven (375oF) until cheese is melted and filling is heated through.Yield: 6 large, thick to 8 medium, thinner panquecas (2 portions, if served straight, or up to 4 portions, if served with side dishes and salad)
Other filling suggestions: prepared ground or shredded beef or turkey; any combination of shredded, cooked vegetables (such as carrots, zucchini, yellow squash, corn, hearts of palm, peas); chopped / small shrimp cooked in tomato sauce; spinach and white sauce.


.JPG)


