Wednesday, April 28, 2010

Red Cabbage Coleslaw


The recent books and TV shows about unhealthy foods are preaching to the choir, at least in my home, but it never hurts to think about one's eating habits and try and improve them one way or the other. I am getting a little more obsessed with the quality and origin of my food every time I read or hear about the subject. It has been many years now since we started buying most of our groceries at Whole Foods Market and on the farmer's market. But until recently I was relying on these "institutions" to make good choices for me; I read the labels without paying too much attention, trusting that all I could buy there would be equally "good". If you look closer, though, not all producers on the farmer's market are certified organic, and not all fruits and vegetables sold at Whole Foods are local (nor organic). To really make educated choices, it takes more than just going to the "right" place, one has to pay close attention to every bit of information (or lack thereof) on everything one buys... Phew.... So in the hurry of grocery shopping with 2 agitated babies, we ended up buying the same things over and over again (read the labels once, buy multiple times!) and it wasn't satisfying our need for variety and creativity.

Thankfully we live in one of the best regions in the world to accomplish what we were aiming for: buy local, organic, fresh, in-season produce without having to think too much about it. We have recently joined Two Small Farms' CSA (Community Supported Agriculture) and so far it has been a great experience. We get a whole box of fruits, veggies and herbs every week, along with a 2-page newsletter explaining what's what and how to cook or prepare all these gems. The freshness surpasses anything we could find even on the farmer's market, as everything goes directly from the fields to our box to our fridge the day it is picked. The cost is significantly lower too... But what I like the best is that we don't know what's in the box until we open it (we could find out online... but it would spoil the surprise) and some of the veggies, we are seeing for the first time in our lives. I know it doesn't appeal to everybody, but to me this is heaven. It really feels like discovering a treasure every week and with ingredients that tasty, it's hard not to make something delicious. From green garlic to rutabagas to rapini greens or erbette chards, we never stop learning. Some items are even called "mystery" when the newsletter is printed before knowing what can be harvested that day. Love it!

We have been adjusting quite smoothly to the large quantity of produce getting into our fridge every week. I am guessing that the box is sized for a family of 4 adults. But so far we have managed to eat everything (and eat out for lunch). Hopefully we'll get to walk to the farmer's market once in a while because I absolutely love walking there from home and meeting the farmers and my neighbors. There is a social aspect to it that we lost with the CSA box.

Our first box contained 2 red cabbages. We had eaten red cabbage before (especially in Munich) but never cooked with it. So I turned to my Joy of Cooking, 75th anniversary edition cookbook and adapted the Becker Coleslaw based on what was in my box. It was crunchy, juicy, refreshing...

Serves 8 (nearly two 1.75-qt (7-cup) Pyrex containers)
  • 1 red cabbage
  • 3 carrots (mine were Chantenay carrots)
  • 1 heart celery
  • 10 sprigs curly parsley
  • zest of 1 organic lemon
  • 1/2 cup balsamic vinegar
  • 1/2 cup olive oil
  • 1 tbsp french mustard
  • 5-10 dashes hot pepper sauce
  • salt and pepper
  1. Dice all the veggies (washed or peeled). Grate the lemon. Discard the stems from the parsley sprigs and mince the leaves. Place all in a large bowl.
  2. Combine the mustard, vinegar, oil, salt and pepper. Whisk well. Pour on the veggies. Add the hot pepper sauce.
  3. Toss, cover and refrigerate overnight.
  4. Serve chill.


Monday, April 19, 2010

Kalaikkose Pirattal (Brussels sprouts curry )


I was really excited when I saw this vegetable in the H mart,since this is one of the rare vegetable found only in big towns like Trichi, Chennai ,Coimbatore, Madurai etc in Tamil Nadu.The people who conduct big functions like weddings manage to get these from the nearest big city like Trichi. The chettinad cooks make tasty dishes out of kalakkose like pirattal,Kuruma etc.
In my first visit to the hmart itself I got this vegetable. I first made kuruma out of this and I was not very much impressed. I think I overcooked the veg. Next I tried the traditional pirattal and it turned out very tasty. My daughter who hates the smell of cabbage was happy that she can taste something similar to cabbage without the smell of cabbage which many dont like.
This dish can be mixed with rice and can be packed for lunch for those who are not big fans of curd rice. This will go very well with curd rice as a side dish.
Ingredients
Kalakkose-10 to 15
Big onion minced-1
Tomato-1 minced
To grind
Grated cocunut-1 table spoon
Small jeera(cumin seed0-1 teaspoon0
Big jeera or sombu(fennel seed)-1 teaspoon
Pottukadalai-1 table spoon or cashews-6
Red chili-3 to 4
To season
Those who dont want it spicy can season with a teaspoon of small jeera and big jeera.
cinamon-1 small piece
Clove-2
Cardomom-2
For parties you can make the dish spicy else season it simply.
Procedure
Cut the brussel sprouts into 4 pieces. Mince onion and tomatoes.Grind the items given in to grind to a smooth paste adding water. Microwave the veg for 2 minutes in a microwavable vessel for 2 minutes. Now add little salt for the veg and again microwave for a minute. Those who dont use microwave can cook the veg in a kadai with water till the vegetable is three fourth cooked.
Keep the kadai in the stove. Add a table spoon of cooking oil.This curry tastes good with little extra oil.Season the curry. Add onions and saute for 2 to 3 minutes. Sprinkle some salt to the onions which will help the onions to get sauted fast. Now add the tomatoes.If you feel that the tomatoes you are using is not very ripe and tender grind it for a second in the mixie. Saute the tomatoes till they are really smashed. While sauting you can smash it with a laddle to help it get smashed fast. Once the onion and tomatoes are smashed like a gravy add the grinded masala into the kadai and cook in low fire stirring continously for 2 minutes. Add little turmeric powder and the salt neede for the masala also. Now add the cooked kalakkose along with the little water in the microwaved bowl. Cook in low fire till the masala gets coated in the veg. You can switch off in the consistency you like.Make sure that the veg gets enough time to get cooked in the masala.


Friday, April 9, 2010

Asparagus Pachai poriyal (Asparagus stir Fry)


Many of my readers will be wondering how I managed to get Asparagus in India. Yes,this is a new veg for me,which I saw in a Korean store H mart in DC. I am in US now eagerly waiting for the arrival of my first grandchild. Till the bundle of joy arrives, I thought of experimenting some from the variety of new vegetables available here.I tried quite a few. The most easiest and tastiest was this Asparagus fry. Many will be thinking why I call this pachai poriyal. We usually call a fry Pachai, if no chili powder is used and is cooked little less. Some of the facts that I found from the net about this vegetable is
Asparagus is a nutrient-dense food which in high in Folic Acid and is a good source of potassium, fiber, vitamin B6, vitamins A and C, and thiamin.
Asparagus has No Fat, contains No Cholesterol and is low in Sodium.


Ingredients
Asparagus-2 bunches
Big onion-1(minced)
pepper powder-1 teaspoon
Turmeric powder-1/2 teaspoon
lemon juice-1 teaspoon
Procedure
Take off the bottom and top 1 inch portion from the asparagus. Cut it as shown in the picture. Mix the lemon juice, pepper powder, turmeric powder and the salt needed and keep aside for 10 minutes. Keep the kadai in the stove. Season the fry with a teaspoon of cumin seed and saute the onion for few minutes. Now add the asparagus and mix well. Don't add any water. Cook just for 5 minutes (till the water in the fry is gone).

Tuesday, March 30, 2010

Panquecas: the name sounds familiar... but it is another matter entirely


Upon request, this post is about Panquecas. Yes, the word should sound very familiar to you, recalling those stacked, warm, fluffy concoctions topped with a good dab of butter and a drizzle of maple syrup you sometimes have for breakfast. But, apart from the fact that the batter uses similar ingredients - such as eggs, milk, and flour - the analogies between Brazilian panquecas and American pancakes stop there, as you can see from this picture:


There are many good things about panquecas, although one might find the preparation of the dough a little tricky and time consuming. But once you master this stage, you are ready to prepare your own assortment of panquecas, because the filling is what really gives them a character. In this sense, they are a good way to use meat, chicken and/or vegetables leftovers. Another good thing is that panquecas can be prepared way in advance and just reheated before serving. They freeze very well too - just remember to transfer the dish to the fridge the night before. As a matter of fact, they can also be successfully reheated in the microwave oven, the only downside being the fact that the cheese will not be as golden brown and the dough won’t get crispy on the edges.

Panquecas are a stand-alone dish, but can also be served with rice (and beans) and salad. If you want them to look fancier, prepare the discs in a larger frying pan and, instead of rolling up with filling, make little bundles, tied with a green scallion leaf or parsley stem wilted in the stove flame. You can then spoon some tomato or other sauce or coulis on a plate and place the trouxinha (Portuguese word for little bundle) in the center. Or use the dough as layers to build a savory cake with any filling you like. Another way to make them look different (and more nutritious) is to add herbs (such as parsley, basil and cilantro), cooked and squeezed spinach, powdered carrot and/or beet, paprika etc. to the batter. The only thing you will need to do, then, is to adjust the consistency. But you’ll have to do it anyway, as different flour batches and egg sizes will produce different batter consistencies.


The only way to adjust the consistency of the batter is by trial and error. The dough should be liquid enough to spread all over the frying pan as you twirl it before starting to set, but not so thin that you have big holes and/or a mushy, creamy final product that falls apart. Adjust it by adding more milk or flour to the batter, little by little. The next picture shows the first panqueca I prepared with my batter - you can see that there is a yellowish layer in the middle that started setting before I was able to spread it onto the pan, making the dough a little too thick. I added a tad more milk to the mixer cup and the next one turned out ok.
Lastly, I have to say a word about the “authenticity” of panquecas as a Brazilian national dish. Most Brazilians would never remember to mention panquecas as a “Brazilian” dish; some would even strongly disagree with this “upgrade” I propose here. But, hey, although they sure are a French legacy, the way Brazilians got hold of them and developed all sorts of new manners to prepare them is, sure, unique! And, as far as I know, panquecas are served all over Brazil. 
I hope you too become a fan of them - as Nina and Kristin already are! After all, imagination is the only limitation to how you can prepare them.

Panquecas de frango
(Chicken panquecas)
Filling:
2 boneless chicken breasts halves, or 2 leg quarters, or any combination of dark/white meat you like
1/2 tsp colorau or powdered annatto seed (optional)
1/2 tsp white wine or cider vinegar
1 Tbsp thinly sliced onion
1 tsp oil
salt and freshly ground black pepper to taste

1 Tbsp vegetable oil
1/3 cup finely chopped onion
2 garlic cloves, minced
1 tsp tomato paste
1 cup shredded carrots (about 2 medium)
1/2 cup corn kernels, frozen or canned (drained)
1/2 cup green peas, fresh or frozen
3/4 cup shredded zucchini (1 small, optional)
1/2 cup chopped tomatoes
salt and freshly ground black pepper, to taste

1. Season chicken with salt, pepper, annatto powder, vinegar, onion and 1/2 tsp oil. Let sit for at least 30 minutes, or overnight. (You can also season the chicken with salt and pepper only right before cooking, but you’ll need to season the refogado very well to compensate for that.)
2. Heat remaining 1/2 tsp oil in a saucepan or pressure cooker and add chicken. Sear until golden brown on all sides.
3. Add enough water to cover the meat and cook on low heat until very tender (15 minutes in the pressure cooker; about 35 minutes in a regular pan, partially covered). Add more water if necessary.
4. Remove chicken from pan, reserving the broth, and shred the meat.
5. Heat 1 Tbsp oil in a saucepan, add onion and fry until translucent. Add garlic and fry until golden brown. Add tomato paste and fry for a few seconds, just to mix it with well with the other ingredients in the pan.
6. Add carrots, corn, peas, and zucchini and refogue on high heat for about 5 minutes, stirring every now and then.
7. Add chopped tomatoes and shredded chicken and cook, on medium heat, partially covered, until vegetables are tender and tomato is almost dissolved (about 10 minutes). Add reserved chicken broth as needed - there should be plenty of moisture in the filling, but it should not be watery or runny.

Batter:
1/2 cup whole milk
1 Tbsp butter, melted
2 large eggs
1/4 tsp salt
6-7 Tbsp all-purpose flour
vegetable oil for frying

1. Combine all ingredients in a blender until well mixed.
2. Heat a drizzle of vegetable oil in a 8-10 inch non-stick frying pan over medium heat. Add about 1/8 of the batter to the hot pan (1/8 of a cup, approximately) in a steady stream, twirling the pan in the air as you pour to spread the batter evenly on the bottom of the pan.
3. Cook until the sides begin to curl up and the bottom is golden brown. Flip over and cook the other side until golden brown.
4. Repeat procedure, stacking the discs as you go, until all the batter has been used (you should have 6 to 8 panquecas, depending on the size of your frying pan).

Tomato sauce:
1 Tbsp olive oil
2 Tbsp finely chopped onion
2 garlic cloves, minced
1 16-oz can crushed tomatoes, or 4 ripe tomatoes, very finely chopped
1/3-1/2 cup chicken broth
2 Tbsp chopped flat-leaf parsley
salt and freshly ground black pepper to taste

1. Heat olive oil in a saucepan. Add onion and fry until translucent. Add garlic and fry until golden brown. Add canned or chopped tomatoes, 1/3 cup chicken broth, salt and pepper to taste.
2. Cover the pan and cook, on medium heat, for about 15 minutes, stirring every now and then. Add more chicken broth, if necessary - the sauce should be thick enough just to stay on top of panquecas, not more.
3. Turn off heat and add chopped parsley.

Assembling:
2 Tbsp grated parmesan cheese
- prepared panqueca dough
- prepared filling
- prepared sauce


1. Depending on the serving size you want (bigger for stand-alone entrées, smaller when served with side dishes and/or a salad), divide the filling among panqueca discs and roll them up.
2. Place cylinders side by side on an oiled baking dish, or arrange them on serving plates (oven proof, if you’re going to reheat them) and pour some tomato sauce along the center, crosswise.
3. Sprinkle with parmesan cheese and bake on preheat oven (375oF) until cheese is melted and filling is heated through.

Yield: 6 large, thick  to 8 medium, thinner panquecas (2 portions, if served straight, or up to 4 portions, if served with side dishes and salad)

Other filling suggestions: prepared ground or shredded beef or turkey; any combination of shredded, cooked vegetables (such as carrots, zucchini, yellow squash, corn, hearts of palm, peas); chopped / small shrimp cooked in tomato sauce; spinach and white sauce.


Wednesday, March 10, 2010

Gluten-free, delicious “pão-de-queijo mineiro”


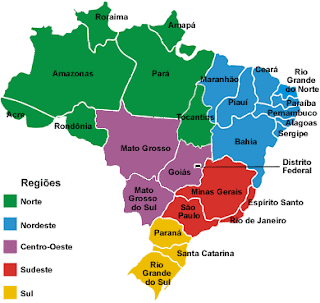
Pão-de-queijo (literally cheese roll) is an irresistible, addicting Brazilian comfort food: a treat to be savored at any time of the day. It is a very popular item in lanchonetes (more later) and padarias (Brazilian-style bakeries) all over the country, especially in the Southeast region - painted red in the map below. People have pães-de-queijo (plural) for breakfast, with coffee, as an afternoon snack, sometimes filled with different kinds of cheese (or other fillings), or at any time of the day they feel hungry and cannot or are not in the mood for a whole meal.


Pão-de-queijo can even be served as an accompaniment to main meals. When I was a child growing up in the country-side of Minas Gerais state (YES!!! I am “mineira”), people used to serve them at wedding parties with thinly sliced pernil (roasted ham) and maionese de legumes (Brazilian-style potato salad) - very “caipira”, and so so yummy!!!

“Caipira” (the same root found in the Brazilian national drink name, “caipirinha”) means “country person”, and/or “pertaining to the country-side”. People from Minas Gerais, or the mineiros (men) and mineiras (women), are known in Brazil as “the” prototypical country people, and there are many jokes and sayings about their proverbial cunning and shrewdness, as well as their cooking abilities.

Legend has it that the best and only authentic pão-de-queijo (the “mineiro” one) comes from the Minas Gerais state - the land of milk and cheese. The original recipe calls for polvilho azedo (“sour” manioc starch, sold in Latin markets as almidón agrio - see picture) and queijo da canastra, a tangy, flavorful, aged farmer’s cheese made with creamy milk from cows eating mainly grass and strolling freely in the pastures of this mountainous state (the picture below is from a farm in my home town, Guaranésia). Thus, to taste the authentic “pão-de-queijo mineiro”, you will have to visit Minas Gerais... (you won’t regret it, I promise!) But, for now, if you want a recipe to prepare a very similar one, here you are.


Actually, I decided to post two recipes here: one is an attempt to get as close as possible to the traditional pão-de-queijo mineiro (or, let’s call it “pão-de-queijo the hard way”). The second one, as I see it, is a recipe for the lazy (or not too versed) cook that does not care much for the tradition and/or does not have enough time to prepare the traditional, handmade one. It uses a blender and a different type of starch, the “sweet” one - polvilho doce (sold as almidón dulce in Latin markets).

One very important note: never ever attempt to bake pão-de-queijo in the microwave oven (I did, with terrible results!). On the other hand, they reheat very well in sandwich / panini makers, specially if you fill them with cheese!


Pão-de-queijo mineiro

1/2 cup vegetable oil
1 1/4 cups whole milk
2 tsp salt (more or less, depending on the cheese mixture you're going to use)
1 lb (500 g) polvilho azedo (Brazilian sour manioc starch)
2 eggs, lightly beaten
1 cup shredded queijo da canastra (or you can try a mix of 2 parts sharp cheddar cheese and 1 part mozzarella, or 1 part mozzarella and 2 parts parmesan cheese, or any other mix of melting, strong-flavored cheeses you like)

1. Combine oil, milk and salt in a sauce pan. Heat to just below boiling point (watch closely - when the mixture starts to rise, remove immediately from heat and use mixture in step 3).
2. Place the polvilho azedo in a large bowl.
3. Pour boiling mixture all over the polvilho azedo and, using a wooden spoon, start stirring the dough.
4. When the dough is cold enough to be kneaded by hand (but still hot), add eggs and cheese and knead until it is very sticky and elastic, about 15 minutes (you will need a spoon or scraper to get it off your hands).
5. Let the dough rest while you preheat the oven to 450oF (it is very important that the oven is at high temperature when you bake the pães-de-queijo; if they start to get too brown on the bottom before getting golden brown on top, reduce the temperature a little bit).
6. Oil two large baking pans. Oil your hands with vegetable oil and form golf-sized balls with the dough (40-45). Place them 2-3 in apart in the pan, as they grow considerably when baked. (You can, at this point, freeze the balls and then store them in zip lock bags to bake them straight from the freezer at your convenience - they will take a little longer to get ready, though.)
7. Bake until puffed and golden brown (about 15 minutes). Serve hot.


Lazy cook pão-de-queijo

2 eggs
1/3 cup vegetable oil
3/4 cup whole milk
1 tsp salt
1/2 cup mozzarella cheese, or a mix of mozzarella and parmesan cheese (or any other melting cheese you like, such as cheddar, gouda, etc)
2 1/2 cups polvilho doce (Brazilian sweet manioc starch)
1 tsp baking powder

1. Oil two 6-muffin pans (medium size). Preheat oven to 435oF.
2. Beat eggs, oil, milk, salt and mozzarella together in a blender.
3. Add half cup of polvilho doce at a time and beat well after each addition. Use a rubber spatula to scrape the sides, if necessary. Add baking powder and pulse 2 or 3 times to mix well.
4. Divide mixture among muffin cups filling them about half way through (the dough expands a lot when baking).
5. Bake until puffed and golden brown. Serve hot.

Eita trem bão, sô!!!

Sunday, February 28, 2010

Warm Portabello Salad


We all (probably) have a food out there that we really just do not enjoy. For me, I find mushrooms to be just unappetizing in every way. Periodically I try to eat them, but often find they return to my (very short) list of foods I avoid.

How then can you explain the mystery when in my produce box appeared this large almost romantically beautiful portabella mushroom? It sat in my fridge for 3 days. And every time I opened the door it seemed to be calling out to me, begging for my attention. One day, I couldn't take it any longer and I gave in. But, how would I enjoy this mushroom when half way through I knew it would once again feel slimy, taste dirty and remind me of its manure filled origin.

The only solution was to add as many of my favorite foods, while still highlighting this mysterious fungus.

First step: butter. I knew the taste would be a challenge therefore adding a bit of butter might help me to dive deeper into the mushroom. After I sliced the mushroom paper thin, I lightly sautéed them in a drizzle of coconut oil with just a bit of butter. The slices of portabella were ecstatic as they danced with the two fabulous fats, but I couldn't stop adding flavor. Thyme, white wine, and then as if a glorious cherry on top I splashed the mess with balsamic. It was a powerful punch and the sizzle and puff of smoke were almost overwhelming.

As the mushrooms melted with flavor I threw a large pile of one of my favorite, bitter greens, arugula into the middle of a salad plate. Once the portabella was satisfyingly hot I spread it onto the greens and watched them sigh and wilt slightly under the heat. I then shaved long slivers of parmesan cheese and a handful of crunched up fresh walnuts to decorate the top. My artwork was complete, but now for the taste by my worst critic... myself!

I loved it. The mushrooms are vinegary, but almost caramelized, the arugula bites back with bitterness that is sweetly met by the walnuts, which complement the rustic charm of the parmesan. So simple and yet my mysterious mushroom craving was finally met. Now, when I talk about mushrooms, I say I prefer not to eat them, unless of course they are in my Warm Portabella Salad.

Warm Portabella Salad
Serves 4-6

2 large portabellas, rinsed & dried to remove the dirt
1 tablespoon coconut oil (or other high heat vegetable oil)
1 tablespoon butter
3 sprigs fresh thyme
¼ cup white wine
2 tablespoons balsamic vinegar
6 cups argula and/or spinach
¼ cup walnuts, broken into pieces
2 ounces parmesan cheese, peeled

To begin, lay the portabella on the rounder side and slice thin. In a medium skillet, heat the coconut oil over medium-high heat. Once it becomes hot and liquid-y add in the butter. As soon as the butter starts to sizzle, spread the mushroom slices in the pan. Allow to sizzle on one side for 4-6 minutes until it is lightly golden. Flip over and repeat on the other side. Continue until all slices are sautéed. When the pan is full of the cooked up mushrooms, add in the leaves of the fresh thyme and the white wine. Allow the wine to absorb for about 1 minute and then toss in the balsamic vinegar. Take care not to inhale the balsamic fumes.
Arrange the arugula and/or spinach on plates or in a salad bowl. Drizzle the balsamic sauce and portabellas on top of the greens, sprinkle with the walnuts and top with the Parmesan strips.

Here are a few other dishes for those who LOVE mushrooms:
Earthy Fig, Chicken & Mushroom Salad - I love the idea of adding Figs!
Bacon, Mushroom, Asparagus Salad -and adding bacon is always a good idea for masking a least favorite food ;)

Saturday, February 20, 2010

Brain fry (Moollai poriyal)

Very easy to cook item. Children will love this. Similar to egg. So cooked along with egg to increase the quantity. Little bit sweet in taste. So those who want it to be hot can add chili powder to the recipe. This is made just like scrambled egg.


Ingredients
Goat brain-1
Chopped onions-handful
Green chili -3 or chili powder-1 teaspoon
Eggs-2
Pepper powder-1 teaspoon
Procedure
Chop the onions and the chili. Break the eggs and beat it a little. Add the brain into the egg and mix it well. I always use my hand to smash the brain and mix it nicely into the egg so that it gets mixed well. Add the pepper powder also into this. In a kadai in one teaspoon of oil sauté the onions and the chili and once it is sauted, add the egg brain mix and stir continuously. The whole thing will turn like egg scramble. Those who want the fry to be hot can add little bit chili powder into the egg brain mix. Brain will get cooked fast. So the cooking time will just be 5 to 6 minutes in low fire.