Tuesday, September 7, 2010

Poorana Kozhukattai (Vinayaga Chathurthi Special)

When we were small ,the first thing that will come to our mind about chathurthi is the sweet poorna kuzhakattai and sundal that will be made in all houses and will be distributed among the neighbouring houses on that day. We used to compare the softness of the kozhukattai made in different houses.
Though I love poorna kuzhakattai,I used to make modagam which is more favourite to vinayagar. But this year I wanted to share this recipe with my readers. For the last one week the Tv channels in Tamilnadu are telecasting the kozhukattai preparation as vinayaga chathurthi is this weekend. One recipe given by an experienced old lady (Forgot to note her name) in podigai Tv samayal sandegangal was really impressive. I tried the recipe today and it came out perfect. I think it is very easy and can never go wrong. The kozhukattai turned out very soft

Ingredients
Raw rice -200 gms (1 uzhakku) (Here we get mavu pacharisi)
Powdered jaggery-1/2 cup
grated coconut-1/2 cup
Cardomom-2
Ghee -2 teaspoon
Gingelly oil-1 tablespoon
Method
Soak the rice for an hour.Grind it well in a mixie.The batter can be watery. After grinding add 1/4 teaspoon salt and a teaspoon gingelly oil into the batter.The batter can be like dosa batter.
Keep a kadai in the stove. Boil 3/4 cup water and pour the grounded batter into the water and stir nicely.The batter will turn like a ball in a minute or two. Switch off the stove. Divide the batter into three portions and knead it into a smooth ball.make it into a single ball and cover it with a wet tissue or cloth.
Now for the coconut poornam , Keep the kadai in the stove.pour 1/4 cup water. Add the jaggerry into the water. Once the jaggerry dissolves, strain the jaggerry using a filter to remove impurities. wash the kadai and pour back the jaggerry and boil till it turns sticky. In medium fire it can be boiled for 3 to 4 minutes. Now add the coconut,ghee and the powdered cardamom and stir well till there is not much water content. Don't keep the coconut for a long tome in the stove. Switch off with in two minutes else the coconut will get roasted. Now the poornam is ready.
Now we have to make the kozhukattai and keep the poornam inside. In tamilnadu lot of ready made achu is available. But if you dont have achu also no problem. The batter will listen to your needs. Make small balls.spread it into flat thin circles as shown or make small kinnams as shown. little bit gingelly oil can also be used for spreading. Youngsters today will do a better work of making different shapes than us. Keep the poornam inside and cover nicely.If you make the first type stick the ends nicely.

Steam the kozhukattai in idly pot or stand. Remember you have to put a cloth or tissue on the idly plate before steaming else the steam from below will change the colour of the kozhukattai.

Sunday, September 5, 2010

Chettinattu Kozhi Kuzhambu ( chettinad chicken gravy(without cocunut) )


Chicken gravy is one item which can be used as a side dish for many food items like chapati, roti, nan, idly or dosa.It will be excellent for rice also. But many of us now don't want to use coconut to make gravy since we grow calorie conscious day by day. Moreover the food items using coconut will not stay good for long. and cannot be stored for a longer period. chettinad dishes usually dont contain too much of coconut.They make tasty gravy without using much coconut.
This recipe of chicken gravy will give you the gravy needed without the use of coconut.Before leaving US I wanted to freeze some food . I did not want to use coconut for freezing. I followed this recipe and the gravy turned out awesome. I come to know that every time they thaw the frozen gravy, It is fresh and good.
For chicken gravy it is always better to use fresh chicken and not the frozen one that people in US get from the stores. When I was there my son-in-law used to get chicken from local Halal shop which was good like the one we get in India. Those who stay abroad can try getting fresh chicken like this if there is a chance to do so.

Ingredients
chicken -2 pounds or 750 gms
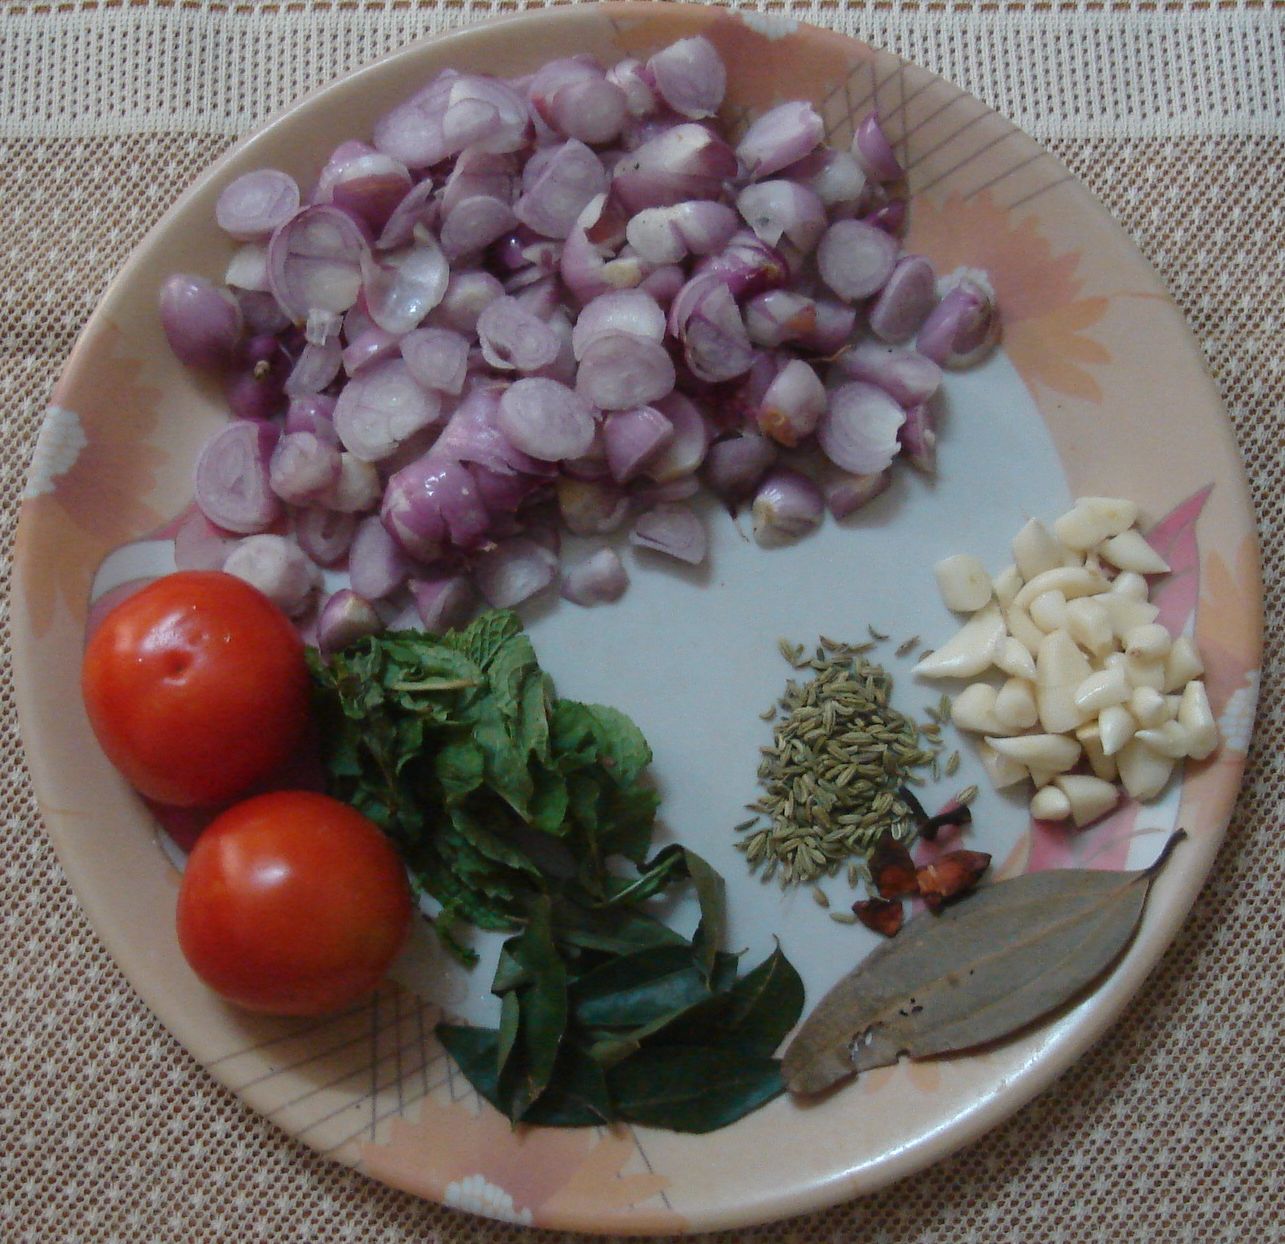
small onion-20 or chopped big onion-1
tomato-1 medium size
Garlic-10 pods
Mint leaf-little (if you have stock)
curry leaf-little
Tamarind paste -1 teaspoon
Coriander leaves- a bunch (for garnishing)
For marination
Kuzhambu milagai thool-1 tablespoon or chili powder-2 teaspoon
Coriander powder-1 table spoon
Thick curd-1 tablespoon
turmeric powder-1 teaspoon
ginger garlic paste-2 teaspoons
salt-1 table spoon (as needed)
Masal for grinding
Big onion-2 (US onion-2 Indian-4)
Tomato-2 (Us tomato-2 Indian-4)
green chili-2
Cashews-8
Kas kas- 1 teaspoon or pottukadalai-1 tablespoon
Cinnamon-1 small piece
clove-2
fennel seeds-1 teaspoon
For seasoning
fennel seeds-1 teaspoon
mint leaf,curry leaf -little (if you have stock)
Cinnamon-small piece
bay leaf-small piece
clove-2
Cinnamon- a small piece

Method
cut the chicken into small pieces,wash well and marinate with the item given in for marination and keep aside for an hour. If you cant wait no problem you can start cooking within 20 minutes.
Keep a kadai in the stove. In one teaspoon of oil saute the items for the masal.First add the chili,then cashews, fennel seeds and kas kas , and wait till they turn little red. Now add the onion and then tomato pieces and saute well for 5 to 6 minutes. Allow it to cool and then grind it to a smooth paste in a mixi.
Keep the cooker in the stove.In one table spoon of oil season the chicken gravy with the items given in'to season'. saute the small onion or the chopped big onion and tomato. Add the marinated chicken pieces also and saute well for 5 minutes. Add 3 cups of water . Mix everything well and cook in medium fire for 7 to 10 minutes (cooking time depends on the chicken quality and the fitness of the cooker you use). however don't cook for more than 10 minutes. open the cooker once the pressure goes and add the grinded masal along with the tamarind paste and allow the gravy to boil for 5 minutes. check for the taste.I f anything is missing you can add now.The cashews and the kas kas or pottukadalai in the masal will make the gravy thicker as it boils. Switch off the stove and garnish with coriander leaves (don't add coriander leaves if you intend to freeze the gravy).Coriander leaves will add much taste to the gravy. Those who don't want the gravy to have any sourness,tamarind can be avoided.But tamarind will help the gravy to stay fresh for a longer time. little bit tamarind is enough.

Wednesday, September 1, 2010

Vazhakkai kola urundai (vegetarian version of kheema balls with plantain)


I am back to my sweet home after a 5 month stay in US. Definitely missing my grandson 24/7. I need 3 or 4 separate blogs to share my experiences abroad.I was really astonished to see the interest of our guys there in cooking.
After coming home I attended few weddings and collected some rare recipes from the famous chettinad cooks being engaged for the wedding.I will slowly share them with my readers.
The first in the list is the vazhakkai kola urundai,this is a real substitute of the mutton kheema balls for the vegetarians.Those who drool over the kheema balls can have an alternate vegetarian item.
Ingredients
Vazhakkai (medium size) -1
small onion-5
garlic-5
kas kas-1 teaspoon
fennel seeds-1 teaspoon
pottukadalai -3 tablespoons ( should be increased according to the size of the vazhakkai)
cashews -8
green chilli-2
red chilli-2
grated cocunut-2 tablespoons
ginger- 1 inch piece
clove-2
cinamon-a small piece


Procedure
cut the vazhakkai into round pieces as shown and cook well. once it cools remove the skin and smash the pieces nicely using hand.
Keep the kadai in the stove. Pour 1 teaspoon oil.Add cinamon and clove first. Then add onion,garlic,chilli,red chilli,ginger and saute. Now add pottukadalai,kas kas and cashews and roast them in low fire. Once pottukadalai and cashews become pink add the grated cocunut and saute till that too become little red.allow everything to cool. Then grind them to a smooth paste in the mixi. Dont add too much water. If by any chance it turns watery add a hand full of pottukadai and grind. Transfer the grinded items into a bowl. Add the smashed vazhakkai and the salt needed and mix well. Check for the taste. If salt or hotness is missing add chilli powder or salt.
Now the dough is ready for frying. Keep a small kadai in the stove. Add the oil required for frying. Make the dough into small balls and fry in medium fire till they turn golden brown. Dont touch the balls till they get cooked . once they seem to be cooked you can turn sides else there is a chance of balls getting broken.
Your veg version of kheema balls are ready. Serve hot along with tomato sauce and get all the name and fame from your loved ones

Blessed with a Baby Girl

A big 'Hi' to all the readers after a long time (exactly after one year ;) ). I am happy to informu all that we have been blessed with a baby girl on May 14th, 2010. Had severe Nausea till 5th month and went under C-section.....etc etc. This one year passed like one week for me. Hope ll be able to blog regularly soon.

Sunday, July 11, 2010

Strawberry Apricot Jam


If I had truly-French breakfasts, the way my grandparents used to have them, I would start my days with a big bowl of café au lait and dip tartines de confiture in it. The coffee would be freshly ground and brewed and would diffuse its delicious smell all around the house. I would add a dash of milk (and maybe drop one or two sugar cubes) in it and stir mechanically while listening to Radio France news. The tartines would be warm strips of fresh baguette, or better yet ficelle (a thinner, crispier version of the famous French bread), layered with butter and home-made jam. I would love the flavors and textures of bread soaked in coffee and coffee infused with butter and jam.

But I don't live in France, so forget the fresh ficelle bought every morning at the boulangerie just down the street. Caffeine makes my heart race, I don't like milk all that much, and I can't stand the sight of wet bread crumbs and melted butter floating in my beverage. For some reason I don't like the flavor combination of butter and jam either. (How odd! They're made for each other!) So my not-so-French breakfast consists of light black tea instead, and slices of whole wheat walnut bread, toasted and spread with either butter or jam, which I carefully keep away from my tea.

I mostly eat store-bought Bonne Maman jam, but there's nothing like home-made jam. And unless you own fruit trees that produce pounds and pounds of fruits every summer, you don't have to embark on a day-long adventure of making pounds and pounds of jam. A few jars are enough. And it doesn't take that long.

Here is a strawberry-apricot jam recipe inspired by the excellent jam recipes of my Larousse de la cuisine.

For 3 or 4 Jars

(I'm using 13-oz, i.e. 370-g, jars.)
  • 2 lb (or 1 kg) organic fruits (about 1/3 apricot, 2/3 strawberries)
  • 2 lb (or 1 kg) sugar (you can use gelling sugar or add fruit pectin but this is optional if you don't mind a slightly runny jam)
  • 1 organic lemon

Day 1


Prepare the fruits as follows:
  1. Rinse the apricots and strawberries, and cut them in 4 or 8 pieces, discarding the pits and stems.
  2. Place the fruit pieces in a glass container. Pour the sugar over them. Close the lid and shake well to coat.
  3. Leave in a cool place overnight.

Day 2

Clean 4 glass jars and their lids in warm, soapy water, then sterilize them for 5 minutes in a large, covered pot of boiling water. Let them dry on a clean kitchen towel.

Cook the jam in several iterations (simmering the fruits, then their juice alone, three times in a row), as follows:
  1. Pour the sugared fruits and all the juice from the glass container in a heavy-bottom pot.
  2. Stir in the lemon juice.
  3. Slowly bring to a boil and simmer for 5 minutes, stirring occasionally with a wooden spoon to dissolve the sugar.
  4. Use a metal skimmer spoon to temporarily remove the fruits from the pot. Reserve the fruits, and simmer the juice for 5 minutes.
  5. Pour the fruits back into the pot; simmer for 5 minutes.
  6. Skim the fruits out (reserve); simmer for 5 minutes.
  7. Do steps 5 and 6 one more time (so total, the fruits have simmered for 15 minutes and the juice for 30 minutes). Stir in the fruits one last time and turn off the heat.
  8. Ladle the hot jam in the jars (you can use a jam funnel to work cleanly. Otherwise, simply wipe the jars with a damp paper towel if jam spills on the outside of the jar). Close the lids tightly. As the jam cools down and the air above it contracts, you will hear the lids pop. (There needs to be enough air, but not too much, between the jam and the lid. If you pour jam all the way to the base of the jar's screw, you should be fine.)
  9. Label the jars with the name of the fruits and the preparation date. Store in your pantry or kitchen closet for up to a year. Once a jar is open (or if the lid didn't pop), keep refrigerated.


Sunday, June 27, 2010

Godumbai Rava Uppuma (Wheat Rava Uppuma )

I am back to blogging after the short break as we are somewhat to a schedule.Still grinding idly batter on a regular basis is difficult. As I regularly have idly batter,I never make any uppuma. But now a days atleast twice in a week we have to make this. I never make bombay rava (white) uppuma (kitchadi) though I love to have it as it is difficult to digest. So the only option was wheat rava and to my surprise,I found that everybody loved it.My daughter wanted me to blog the recipe so that she can make it after I leave. This recipe will be very useful for the bachelors who cannot have idly batter all the time. Those who want to avoid rice and want to have wheat can also go for this. This is an excellent food for diabetic patients.
Ingredients
Broken wheat rava (nicely broken) 2 cups
onion minced - 1 cup
green chillies-6
Frozen vegetables or fresh carrot,beans and peas - 1/2 cup (optional)
grated cocunut-1 table spoon (optional)
For seasoning
Mustard seeds-1 teaspoon
channa dhal-1 table spoon
curry leaf-little

Procedure
keep the pressure cooker in the stove.In two table spoons of oil season the uppuma with the items given in 'to season'.Saute the onions and green chillies for 2 minutes.Now add the rava also and saute for a minute in medium fire.Add 4 cups of water.1:2 is the ratio of water to rava.Immediately add the salt needed. Remember that after cooking it will be like 2 cups of rice cooked.So add the salt necessary for that quantity. Close the cooker.make sure that the stove is in low fire. Switch off the stove after 10 minutes.Wait for the pressure to be released.if you are sure that the bottom is not burnt ,add the frozen vegetable (cooked for 3 minutes in water) or the fresh vegetables cooked well now. Mix everything nicely. If you feel that the bottom is burnt mix in such a way that you don't reach the burnt part. Add the grated coconut also along with the vegetables.If the fire is low the bottom will never get burnt.Vegetables and coconut is optional.The uppuma will be very tasty without these also.
I Used this brand of Wheat Rava.I think that all other brands will be equally good.

Monday, June 21, 2010

Beef with carrots


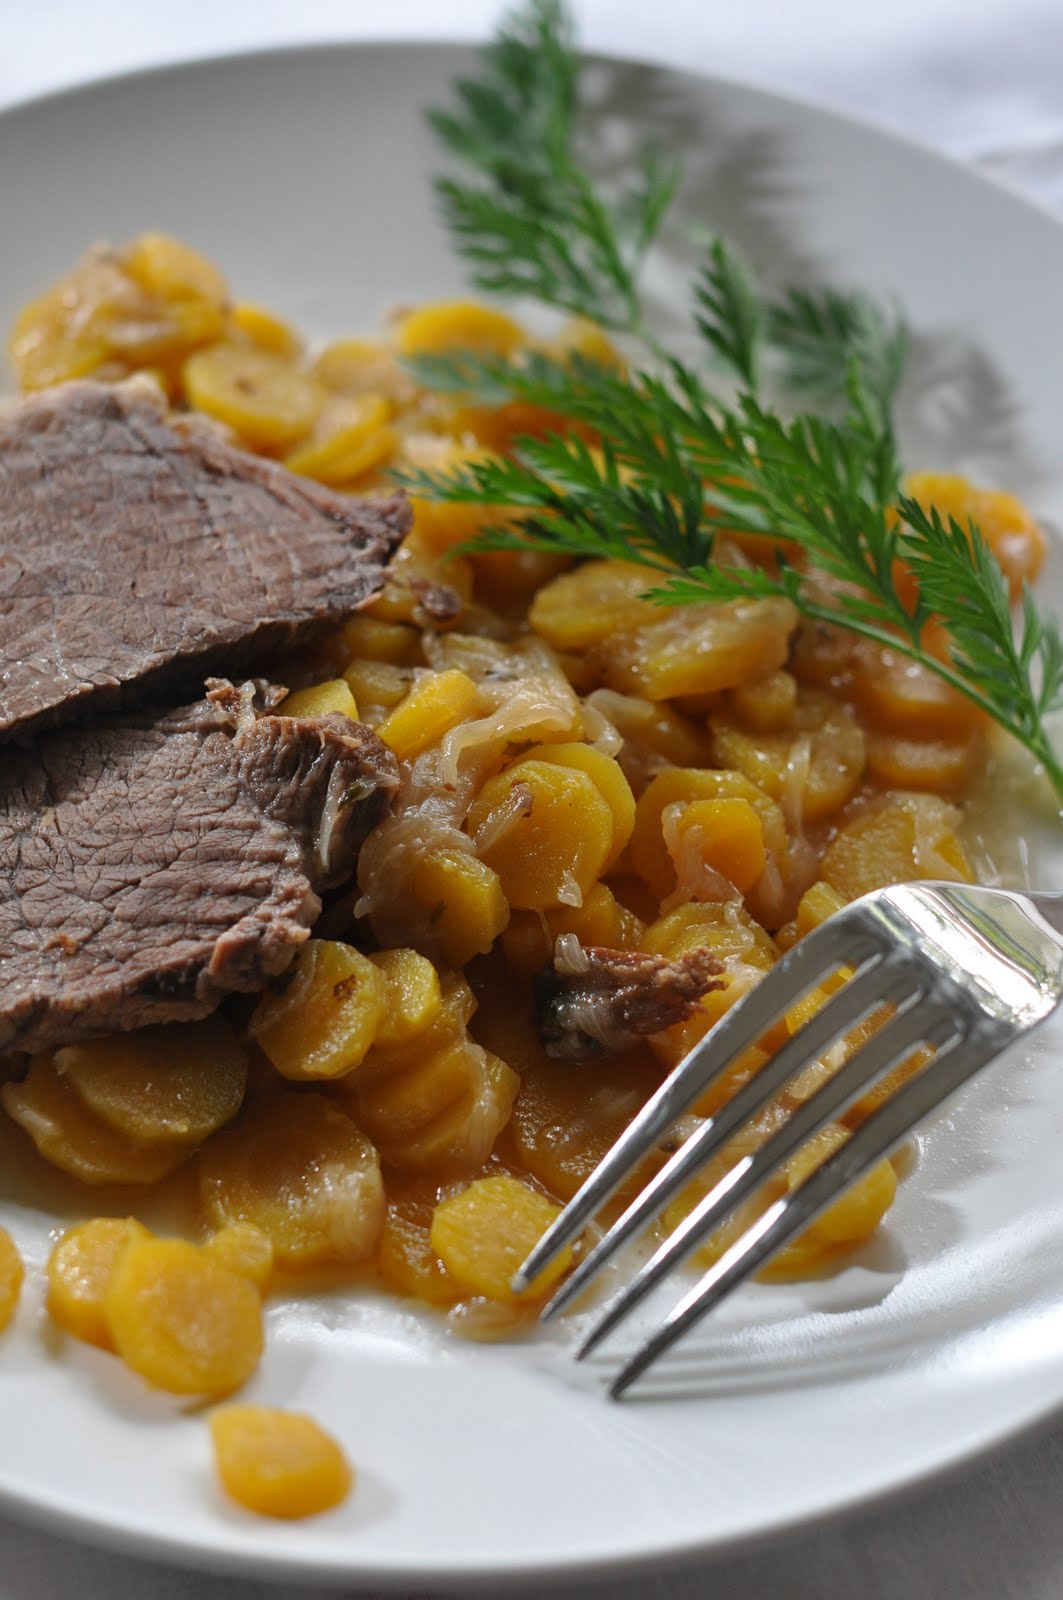
My great-grandmother–my mom's mom's mom–called it "bœuf mode". It is a traditional French braised beef dish, one that belongs to the so-called "cuisine bourgeoise" ("simple and of good taste", as Larousse puts it). The recipe is so classic it's in the dictionary: "larded beef cooked with onions and carrots".

My mother learned the recipe from her grandmother when she was a teenager. Over the years, she made a few adjustments. For example she started using a different cut of meat after talking to her friend's dad, who was a butcher (the original cut was more fibrous). She cooks the meat in one piece and slices it once cooked, while her grandmother cooked it in cubes. The sauce is not as thick nor as spicy as my mom remembers it from her childhood. Even the name has changed: my mom calls it "bœuf aux carottes" (beef with carrots) rather than "bœuf mode". But one thing remains: it is the family's favorite comfort food. Every morsel of meat, every slice of carrot melts in the mouth. It is absolutely delicious.

Here is how my mom (and I) prepare it:

Serves 6
Prep time: 10 minutes
Cooking time: 1 hour (pressure cooker) or 2 hours (regular pot)
  • 2-3 lb boneless beef chuck roast1 ("paleron")
  • about 12 carrots (2-3 per person), sliced2
  • 1 yellow onion, chopped
  • 2 cloves garlic
  • 1 bay leaf, 2 sprigs thyme, and 3 sprigs parsley, tied together ("bouquet garni")
  • 1 vegetable bouillon cube3
  • 1-2 cups dry white wine (e.g. Pino Grigio or Chardonnay)
  • 1 tbsp unsalted butter
  • 1 tbsp sunflower oil (or other mild-flavored oil recommended for high heat)
  1. Heat the oil and butter in a pressure cooker ("cocotte minute"). Add the chopped onion and stir for about 2 minutes until translucent.
  2. Add the beef roast and brown on all sides.
  3. Add the carrots, garlic, herbs, white wine, and bouillon cube. Close the pressure cooker and set it to its higher pressure level (mine has two levels, one for vegetables and one for meats).
  4. When the pressure cooker whistles, turn down the heat to medium-low. Cook for 45 minutes to 1 hour. (If you are using a regular pot, simmer for 2 hours, lid on.)
You might have some left-over meat. Eat it cold with Dijon mustard.

1 local, organic, 100% grass-fed beef if you can
2 there is this funny controversy in my family about how the carrots should be cut. Some (on my mom's side of the family) swear they should be sliced while others (on my dad's side of the family) prefer them julienned (cut into thin strips). Whoever cooks chooses their favorite carrot shape.
3 my favorite bouillon cube is KUB OR by Maggi but unfortunately it isn't sold in the U.S.