Sunday, October 31, 2010

Nenju Elumbu Soup or Maarkandam soup ( Lamb Rib bone soup)


When we were young On Sunday’s at 11 in the morning either we will have aattu managai , eeral soup or this nenju elumbu soup. Now all have become calorie conscious and don’t want to go to the mutton shop itself. But the medicinal value of these soups can never be replaced by any other food.
Nenjelumbu soup does not contain much fat and those who access a mutton shop to get this can can surely give this soup a try. The soup is very good when we are suffering from cold or recovering from any illness. The soup alone can be taken in a bowl and be given to kids right from the 18 month old baby.
All at home are suffering from cold due to change of climate. So I thought of making this soup. I always prefer this to chicken soup as I feel that chicken soup if taken in large quantity leads to dry cough . For the bad cold we are having, the soup was really heavenly. After taking the soup there was a great relief. So I immediately thought of sharing the recipe with my readers
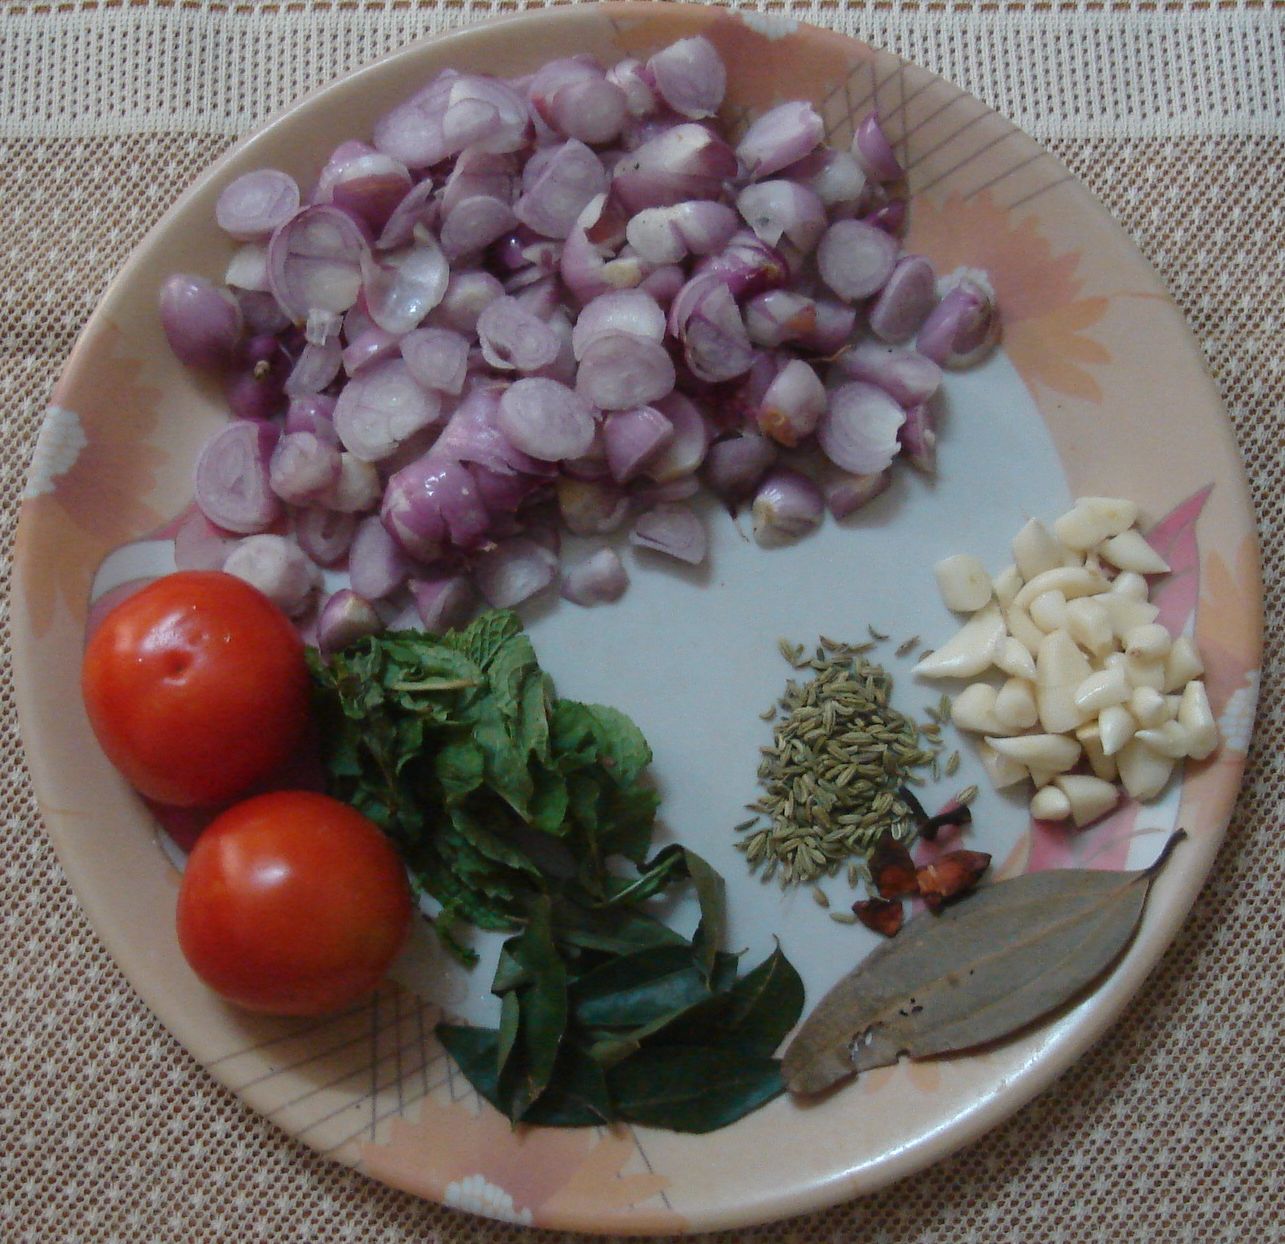
Ingredients
Nenju elumbu -200gms (If not available lamb bones can be replaced)
Small onion-10 or big onion (medium size-1 )
Small tomato -1
Rice washed water-2 cups (optional) For grinding
Pepper corns-1 teaspoon
Small jeera -1 teaspoon
Dhania or dry Malli -1 ½ teaspoon
Red chili -1
Procedure
Before cooking the rice for the day, wash it and soak for 5 minutes. Drain the water and keep ready. Put the nenjelumbu, onion ,tomato and very little salt along with a teaspoon of turmeric powder in the cooker. Add the rice washed water also and cook for 10 minutes . Grind the items to be grinded in the small jar. Once the pressure goes open the cooker and add the grinded powder and allow the soup to boil for 5 minutes. There should be 4 cups of soup for this quantity ofnenjuelumbu. Dont add too much or too little water. If soup is less, water can be added and check for the correct hotness and salt. While cooking this checking is very important. If you want the soup to be little more hot, add little more milagu jeeraga powder. I hope all will have this pepper jeera powder stock at home to be used for omelet or rasam. Salt also can be added according to taste. After 5 to 6 minutes switch off the stove. Serve the soup hot. Garnish with coriander leaves while serving.

Friday, October 29, 2010

Poondu Thuvaiyal or Chutney (Side dish with garlic)

In many parts of Tamilnadu this side dish is very popular and which is not so in chettinad.My neighbors used to tell that they have to make few idly’s more if they have poondu chutney. I always had a feel that the chutney will have excess garlic flavor which will make us embarrassing while we go out due to its odd smell. So I never bothered to try it. But one of my neighbors insisted me to try this at least once. She is very dedicated in cooking that she hand grinds it each time. I told her that I can’t do so. She asked me to grind it at least in the mixi and taste. My next doubt was how much garlic I can peel to have a good amount of chutney. Garlic costs Rs 250 a kg now. Though that is not a matter to be bothered for we people, we always use less of a thing when it is off season.
I should really agree that it was delicious and mouth watering . My younger one loved it and asked me why I never used to do that chutney. I told this recipe to my elder daughter in US and she too loved it. She gets peeled big garlic there and finds it very easy to do this chutney when in a hurry. Bachelors there can buy and store the peeled garlic in the fridge and can use the chutney as a side dish for frozen chapatti as well. Little chutney will be enough for 3 or 4 idly’s. The qty of chutney will be less as the ingredients are less.
Ingredients
Whole garlic -2 or 3
Tomato -2 (medium size)
Red chili -3 or 4 (according to taste)
For seasoning
Oil (gingerly if available) – 1 table spoon
Mustard -1 teaspoon
Broken urudh dhal -1 teaspoon
Curry leaf –little
Procedure
The procedure is very simple. Note that no onions are used. Cut the tomatoes into small pieces. Keep the kadai in the stove. In little oil sauté the chilies first and remove it from the oil. Then sauté the garlic and tomatoes nicely till the garlic gets almost cooked. Finally add the salt needed and allow the mix to cool. Once it cools grind it nicely in the small jar. Even after grinding if there are small pieces of garlic inside don’t bother. It will be tasty as a whole. After removing it from the mixi season the chutney and pour it on top of the chutny and mix well till the oil gets mixed nicely into the whole chutney.

Thursday, October 28, 2010

Thenkuzhal Mavu Or Murukku Mavu

Deepavali is fast approaching and the thought of what to make at home for deepavali will be running in everybody’s mind now. Whatever snack we buy outside can’t compromise the home made thenkuzhal or murukku. Chettinad snacks are very famous especially thenkuzhal, Kai murukku, Cheeppu cheedai, Mavurundai, Managolam etc.
There is difference between thenkuzhal and Kai murukku and their mavu, but for the readers sake I have mentioned as thenkuzhal or murukku as same since many know thenkuzhal as murukku only. Now days we never make Kai murukku at home and no need to bother about that. The specialty of chettinad thenkuzhal is that it won’t turn red but at the same time will be very crispy. Many are doubtful of the exact proportions and I hope the blog will be useful for those who can manage to find a mill to grind the mavu.

Ingredients
Rice -7 uzhakku or 7 cups
Broken urudh dhal -2 cups (whole urudh dhal won’t get roasted fast)

Procedure
Procedure is more important than proportions. No need to wash the rice and dry it under the sun.
Take 2 soft towels. I use eerizhai thundu or Co-optex towel. Wet the towel nicely and squeeze out the water. Take handful rice and clean it nicely with the towel and put it in a paper under the fan. Likewise clean the entire rice. Use different parts of the towel for each handful. Allow the rice to dry nicely. It will dry fast as you have not washed the rice.
The next important thing is how to roast the urudh dhal
Put the frying pan in the stove. Keep the stove in low fire. Add a handful or two of urudh dhal and roast in low fire for 5 minutes. The urudh dhal should be roasted in such a way that it should never get red at the same time be well roasted. Likewise roast the whole urudh dhal. The two cups has to be divided into 5 portions for roasting. Allow the urudh dhal to cool and mix it with the rice and take it to the mill for grinding.
While going to the mill take with you 2 cups of rice also. The thenkuzhal mavu in the mill should be grinded only after grinding rice flour or somebody else’s murukku mavu. So if you don’t see the person in the line not grinding either of these you grind the rice which you have brought. If the Thenkuzhal mavu is grinded after grinding wheat flour or ragi, it will spoil the murukku you are making.
Once the mavu is ready, things are simple .Just add enough water and salt and mix the flour. Put it in the kuzhal or press and make murukku. In chettinad we don’t add anything else to the mavu. If desired little chili powder can be added for kara murukku. No need omam or jeeragam. Those things will make the murukku burst or crack in the oil and cause danger. Enjoy the crispy murukku with family

Tuesday, September 7, 2010

Poorana Kozhukattai (Vinayaga Chathurthi Special)

When we were small ,the first thing that will come to our mind about chathurthi is the sweet poorna kuzhakattai and sundal that will be made in all houses and will be distributed among the neighbouring houses on that day. We used to compare the softness of the kozhukattai made in different houses.
Though I love poorna kuzhakattai,I used to make modagam which is more favourite to vinayagar. But this year I wanted to share this recipe with my readers. For the last one week the Tv channels in Tamilnadu are telecasting the kozhukattai preparation as vinayaga chathurthi is this weekend. One recipe given by an experienced old lady (Forgot to note her name) in podigai Tv samayal sandegangal was really impressive. I tried the recipe today and it came out perfect. I think it is very easy and can never go wrong. The kozhukattai turned out very soft

Ingredients
Raw rice -200 gms (1 uzhakku) (Here we get mavu pacharisi)
Powdered jaggery-1/2 cup
grated coconut-1/2 cup
Cardomom-2
Ghee -2 teaspoon
Gingelly oil-1 tablespoon
Method
Soak the rice for an hour.Grind it well in a mixie.The batter can be watery. After grinding add 1/4 teaspoon salt and a teaspoon gingelly oil into the batter.The batter can be like dosa batter.
Keep a kadai in the stove. Boil 3/4 cup water and pour the grounded batter into the water and stir nicely.The batter will turn like a ball in a minute or two. Switch off the stove. Divide the batter into three portions and knead it into a smooth ball.make it into a single ball and cover it with a wet tissue or cloth.
Now for the coconut poornam , Keep the kadai in the stove.pour 1/4 cup water. Add the jaggerry into the water. Once the jaggerry dissolves, strain the jaggerry using a filter to remove impurities. wash the kadai and pour back the jaggerry and boil till it turns sticky. In medium fire it can be boiled for 3 to 4 minutes. Now add the coconut,ghee and the powdered cardamom and stir well till there is not much water content. Don't keep the coconut for a long tome in the stove. Switch off with in two minutes else the coconut will get roasted. Now the poornam is ready.
Now we have to make the kozhukattai and keep the poornam inside. In tamilnadu lot of ready made achu is available. But if you dont have achu also no problem. The batter will listen to your needs. Make small balls.spread it into flat thin circles as shown or make small kinnams as shown. little bit gingelly oil can also be used for spreading. Youngsters today will do a better work of making different shapes than us. Keep the poornam inside and cover nicely.If you make the first type stick the ends nicely.

Steam the kozhukattai in idly pot or stand. Remember you have to put a cloth or tissue on the idly plate before steaming else the steam from below will change the colour of the kozhukattai.

Sunday, September 5, 2010

Chettinattu Kozhi Kuzhambu ( chettinad chicken gravy(without cocunut) )


Chicken gravy is one item which can be used as a side dish for many food items like chapati, roti, nan, idly or dosa.It will be excellent for rice also. But many of us now don't want to use coconut to make gravy since we grow calorie conscious day by day. Moreover the food items using coconut will not stay good for long. and cannot be stored for a longer period. chettinad dishes usually dont contain too much of coconut.They make tasty gravy without using much coconut.
This recipe of chicken gravy will give you the gravy needed without the use of coconut.Before leaving US I wanted to freeze some food . I did not want to use coconut for freezing. I followed this recipe and the gravy turned out awesome. I come to know that every time they thaw the frozen gravy, It is fresh and good.
For chicken gravy it is always better to use fresh chicken and not the frozen one that people in US get from the stores. When I was there my son-in-law used to get chicken from local Halal shop which was good like the one we get in India. Those who stay abroad can try getting fresh chicken like this if there is a chance to do so.

Ingredients
chicken -2 pounds or 750 gms
small onion-20 or chopped big onion-1
tomato-1 medium size
Garlic-10 pods
Mint leaf-little (if you have stock)
curry leaf-little
Tamarind paste -1 teaspoon
Coriander leaves- a bunch (for garnishing)
For marination
Kuzhambu milagai thool-1 tablespoon or chili powder-2 teaspoon
Coriander powder-1 table spoon
Thick curd-1 tablespoon
turmeric powder-1 teaspoon
ginger garlic paste-2 teaspoons
salt-1 table spoon (as needed)
Masal for grinding
Big onion-2 (US onion-2 Indian-4)
Tomato-2 (Us tomato-2 Indian-4)
green chili-2
Cashews-8
Kas kas- 1 teaspoon or pottukadalai-1 tablespoon
Cinnamon-1 small piece
clove-2
fennel seeds-1 teaspoon
For seasoning
fennel seeds-1 teaspoon
mint leaf,curry leaf -little (if you have stock)
Cinnamon-small piece
bay leaf-small piece
clove-2
Cinnamon- a small piece

Method
cut the chicken into small pieces,wash well and marinate with the item given in for marination and keep aside for an hour. If you cant wait no problem you can start cooking within 20 minutes.
Keep a kadai in the stove. In one teaspoon of oil saute the items for the masal.First add the chili,then cashews, fennel seeds and kas kas , and wait till they turn little red. Now add the onion and then tomato pieces and saute well for 5 to 6 minutes. Allow it to cool and then grind it to a smooth paste in a mixi.
Keep the cooker in the stove.In one table spoon of oil season the chicken gravy with the items given in'to season'. saute the small onion or the chopped big onion and tomato. Add the marinated chicken pieces also and saute well for 5 minutes. Add 3 cups of water . Mix everything well and cook in medium fire for 7 to 10 minutes (cooking time depends on the chicken quality and the fitness of the cooker you use). however don't cook for more than 10 minutes. open the cooker once the pressure goes and add the grinded masal along with the tamarind paste and allow the gravy to boil for 5 minutes. check for the taste.I f anything is missing you can add now.The cashews and the kas kas or pottukadalai in the masal will make the gravy thicker as it boils. Switch off the stove and garnish with coriander leaves (don't add coriander leaves if you intend to freeze the gravy).Coriander leaves will add much taste to the gravy. Those who don't want the gravy to have any sourness,tamarind can be avoided.But tamarind will help the gravy to stay fresh for a longer time. little bit tamarind is enough.

Wednesday, September 1, 2010

Vazhakkai kola urundai (vegetarian version of kheema balls with plantain)


I am back to my sweet home after a 5 month stay in US. Definitely missing my grandson 24/7. I need 3 or 4 separate blogs to share my experiences abroad.I was really astonished to see the interest of our guys there in cooking.
After coming home I attended few weddings and collected some rare recipes from the famous chettinad cooks being engaged for the wedding.I will slowly share them with my readers.
The first in the list is the vazhakkai kola urundai,this is a real substitute of the mutton kheema balls for the vegetarians.Those who drool over the kheema balls can have an alternate vegetarian item.
Ingredients
Vazhakkai (medium size) -1
small onion-5
garlic-5
kas kas-1 teaspoon
fennel seeds-1 teaspoon
pottukadalai -3 tablespoons ( should be increased according to the size of the vazhakkai)
cashews -8
green chilli-2
red chilli-2
grated cocunut-2 tablespoons
ginger- 1 inch piece
clove-2
cinamon-a small piece


Procedure
cut the vazhakkai into round pieces as shown and cook well. once it cools remove the skin and smash the pieces nicely using hand.
Keep the kadai in the stove. Pour 1 teaspoon oil.Add cinamon and clove first. Then add onion,garlic,chilli,red chilli,ginger and saute. Now add pottukadalai,kas kas and cashews and roast them in low fire. Once pottukadalai and cashews become pink add the grated cocunut and saute till that too become little red.allow everything to cool. Then grind them to a smooth paste in the mixi. Dont add too much water. If by any chance it turns watery add a hand full of pottukadai and grind. Transfer the grinded items into a bowl. Add the smashed vazhakkai and the salt needed and mix well. Check for the taste. If salt or hotness is missing add chilli powder or salt.
Now the dough is ready for frying. Keep a small kadai in the stove. Add the oil required for frying. Make the dough into small balls and fry in medium fire till they turn golden brown. Dont touch the balls till they get cooked . once they seem to be cooked you can turn sides else there is a chance of balls getting broken.
Your veg version of kheema balls are ready. Serve hot along with tomato sauce and get all the name and fame from your loved ones

Blessed with a Baby Girl

A big 'Hi' to all the readers after a long time (exactly after one year ;) ). I am happy to informu all that we have been blessed with a baby girl on May 14th, 2010. Had severe Nausea till 5th month and went under C-section.....etc etc. This one year passed like one week for me. Hope ll be able to blog regularly soon.