Sunday, June 27, 2010

Godumbai Rava Uppuma (Wheat Rava Uppuma )

I am back to blogging after the short break as we are somewhat to a schedule.Still grinding idly batter on a regular basis is difficult. As I regularly have idly batter,I never make any uppuma. But now a days atleast twice in a week we have to make this. I never make bombay rava (white) uppuma (kitchadi) though I love to have it as it is difficult to digest. So the only option was wheat rava and to my surprise,I found that everybody loved it.My daughter wanted me to blog the recipe so that she can make it after I leave. This recipe will be very useful for the bachelors who cannot have idly batter all the time. Those who want to avoid rice and want to have wheat can also go for this. This is an excellent food for diabetic patients.
Ingredients
Broken wheat rava (nicely broken) 2 cups
onion minced - 1 cup
green chillies-6
Frozen vegetables or fresh carrot,beans and peas - 1/2 cup (optional)
grated cocunut-1 table spoon (optional)
For seasoning
Mustard seeds-1 teaspoon
channa dhal-1 table spoon
curry leaf-little

Procedure
keep the pressure cooker in the stove.In two table spoons of oil season the uppuma with the items given in 'to season'.Saute the onions and green chillies for 2 minutes.Now add the rava also and saute for a minute in medium fire.Add 4 cups of water.1:2 is the ratio of water to rava.Immediately add the salt needed. Remember that after cooking it will be like 2 cups of rice cooked.So add the salt necessary for that quantity. Close the cooker.make sure that the stove is in low fire. Switch off the stove after 10 minutes.Wait for the pressure to be released.if you are sure that the bottom is not burnt ,add the frozen vegetable (cooked for 3 minutes in water) or the fresh vegetables cooked well now. Mix everything nicely. If you feel that the bottom is burnt mix in such a way that you don't reach the burnt part. Add the grated coconut also along with the vegetables.If the fire is low the bottom will never get burnt.Vegetables and coconut is optional.The uppuma will be very tasty without these also.
I Used this brand of Wheat Rava.I think that all other brands will be equally good.

Monday, June 21, 2010

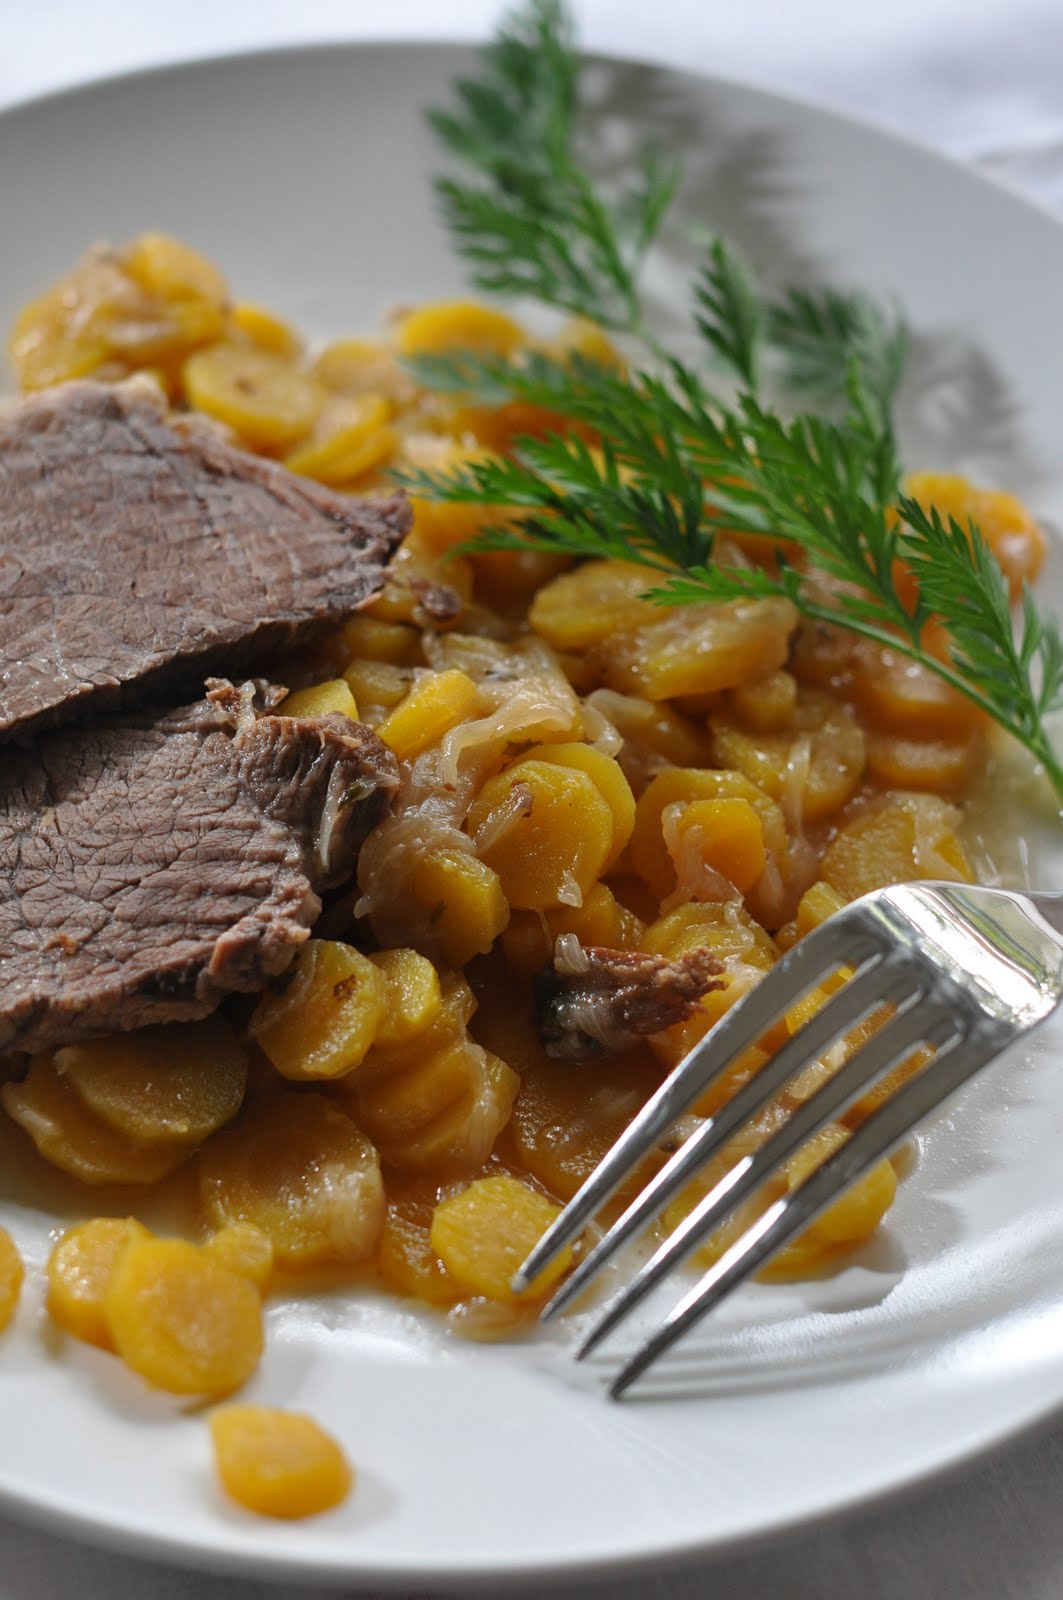
Beef with carrots


My great-grandmother–my mom's mom's mom–called it "bœuf mode". It is a traditional French braised beef dish, one that belongs to the so-called "cuisine bourgeoise" ("simple and of good taste", as Larousse puts it). The recipe is so classic it's in the dictionary: "larded beef cooked with onions and carrots".

My mother learned the recipe from her grandmother when she was a teenager. Over the years, she made a few adjustments. For example she started using a different cut of meat after talking to her friend's dad, who was a butcher (the original cut was more fibrous). She cooks the meat in one piece and slices it once cooked, while her grandmother cooked it in cubes. The sauce is not as thick nor as spicy as my mom remembers it from her childhood. Even the name has changed: my mom calls it "bœuf aux carottes" (beef with carrots) rather than "bœuf mode". But one thing remains: it is the family's favorite comfort food. Every morsel of meat, every slice of carrot melts in the mouth. It is absolutely delicious.

Here is how my mom (and I) prepare it:

Serves 6
Prep time: 10 minutes
Cooking time: 1 hour (pressure cooker) or 2 hours (regular pot)
  • 2-3 lb boneless beef chuck roast1 ("paleron")
  • about 12 carrots (2-3 per person), sliced2
  • 1 yellow onion, chopped
  • 2 cloves garlic
  • 1 bay leaf, 2 sprigs thyme, and 3 sprigs parsley, tied together ("bouquet garni")
  • 1 vegetable bouillon cube3
  • 1-2 cups dry white wine (e.g. Pino Grigio or Chardonnay)
  • 1 tbsp unsalted butter
  • 1 tbsp sunflower oil (or other mild-flavored oil recommended for high heat)
  1. Heat the oil and butter in a pressure cooker ("cocotte minute"). Add the chopped onion and stir for about 2 minutes until translucent.
  2. Add the beef roast and brown on all sides.
  3. Add the carrots, garlic, herbs, white wine, and bouillon cube. Close the pressure cooker and set it to its higher pressure level (mine has two levels, one for vegetables and one for meats).
  4. When the pressure cooker whistles, turn down the heat to medium-low. Cook for 45 minutes to 1 hour. (If you are using a regular pot, simmer for 2 hours, lid on.)
You might have some left-over meat. Eat it cold with Dijon mustard.

1 local, organic, 100% grass-fed beef if you can
2 there is this funny controversy in my family about how the carrots should be cut. Some (on my mom's side of the family) swear they should be sliced while others (on my dad's side of the family) prefer them julienned (cut into thin strips). Whoever cooks chooses their favorite carrot shape.
3 my favorite bouillon cube is KUB OR by Maggi but unfortunately it isn't sold in the U.S.


Thursday, June 3, 2010

Coxinha: the beloved queen of Brazilian salgadinhos


Brazilian salgados or salgadinhos - savory little snacks you can eat at any time of the day you are not hungry enough for a complete meal - comprise dozens of categories, such as empada (also called empadinha), risoles, pastel, quibe, esfiha, croquete, bolinha de queijo, enrolado, folhado, pão de batata, and their several variations (i.e., most of them can be prepared with different fillings). But coxinhas are among the favorite ones. They can be found in nearly all lanchonetes and padarias in Brazil and were very popular at birthday parties some time ago.  

The name coxinha derives from the snack’s peculiar drop shape, mocking a chicken drumstick (which, in Portuguese, is curiously called “coxa” [= thigh] only when referring to chickens; the chicken thigh is called sobrecoxa...). The golden, crispy exterior of this salgadinho surrounds a layer of soft dough filled with lightly seasoned, moist shredded chicken. Some people love to eat them dotting each bite with some good hot red pepper sauce.

The major “secret” to prepare coxinhas is patience. It takes a while to mold them, especially if it’s your first time. Be careful not to let the filling touch the edges of the dough disc, and make sure it is well sealed around the filling, or it will crack open when fried. Coxinhas can be molded as big, individual pieces (virtually a meal), or bite-sized. 

The cooked dough is very easy to prepare, as well as the filling. The dough can also be used to make other salgadinhos, such as risoles (half-moon shapped) and bolinhas de queijo (cheese balls). Use fine bread crumbs (grind some panko in the processor, if you wish) to bread them and, instead of dropping them in the egg white, dip your hand in it and use it spread a layer of egg white on the surface of coxinhas before tossing them in the breadcrumbs.

I hope you enjoy them as much as I do!

Coxinha de frango
(mock chicken drumsticks)


Dough
2 cups chicken stock
2 1/8 cups all-purpose flour
2 Tbsp powdered milk
2 Tbsp butter (room temperature)
1 tsp salt

1. Process all ingredients in a blender until smooth.
2. Cook in a heavy pan, over medium heat, stirring constantly until the dough forms a ball that pulls away from the sides of the pan (make sure there are not wet spots in the dough).
3. Let it cool and use to mold the coxinhas

Filling
1 Tbsp vegetable oil
1 Tbsp grated onion
1 small garlic clove, minced
1/2 tsp colorau or anatto powder
2 boneless chicken breast halves
1 Tbsp finely chopped parsley
1 Tbsp finely chopped scallion
salt and freshly ground black pepper to taste

1. Cook chicken in about 3 cups water. Reserve 2 cups of the cooking liquid to prepare the dough.
2. Finely shred chicken.
3. Heat oil in a saucepan, add onion, then garlic and then colorau. Fry until golden brown.
4. Add shredded chicken and about 3 Tbsp cooking liquid - the chicken should be moist, but not runny.
5. Turn off the heat and add chopped herbs. Season to taste with salt and pepper.

Molding and frying
1 egg white
1 cup plain panko, finely ground, or fine breadcrumbs
2-3 cups vegetable oil, for frying

1. Take a portion of dough about the size of a golf ball and roll it out manually or with a rolling pin into a disk about 1/4 in. thick.
2. Place a teaspoonful of filling at the center - be careful not to let the filling touch the edges of the dough. Carefully mold the dough around the filling forming a bundle.
3. Twist the excess dough on top and remove it to obtain a drop shape.
4. Smooth the surface, if necessary, to correct any imperfections. Make sure the filling is well sealed into the dough.
5. Wet your hand in the egg white and spread a thin layer on the coxinha surface and dip in breadcrumbs.
6. Fry in hot oil until golden brown. Let drain on paper towels.


Friday, May 21, 2010

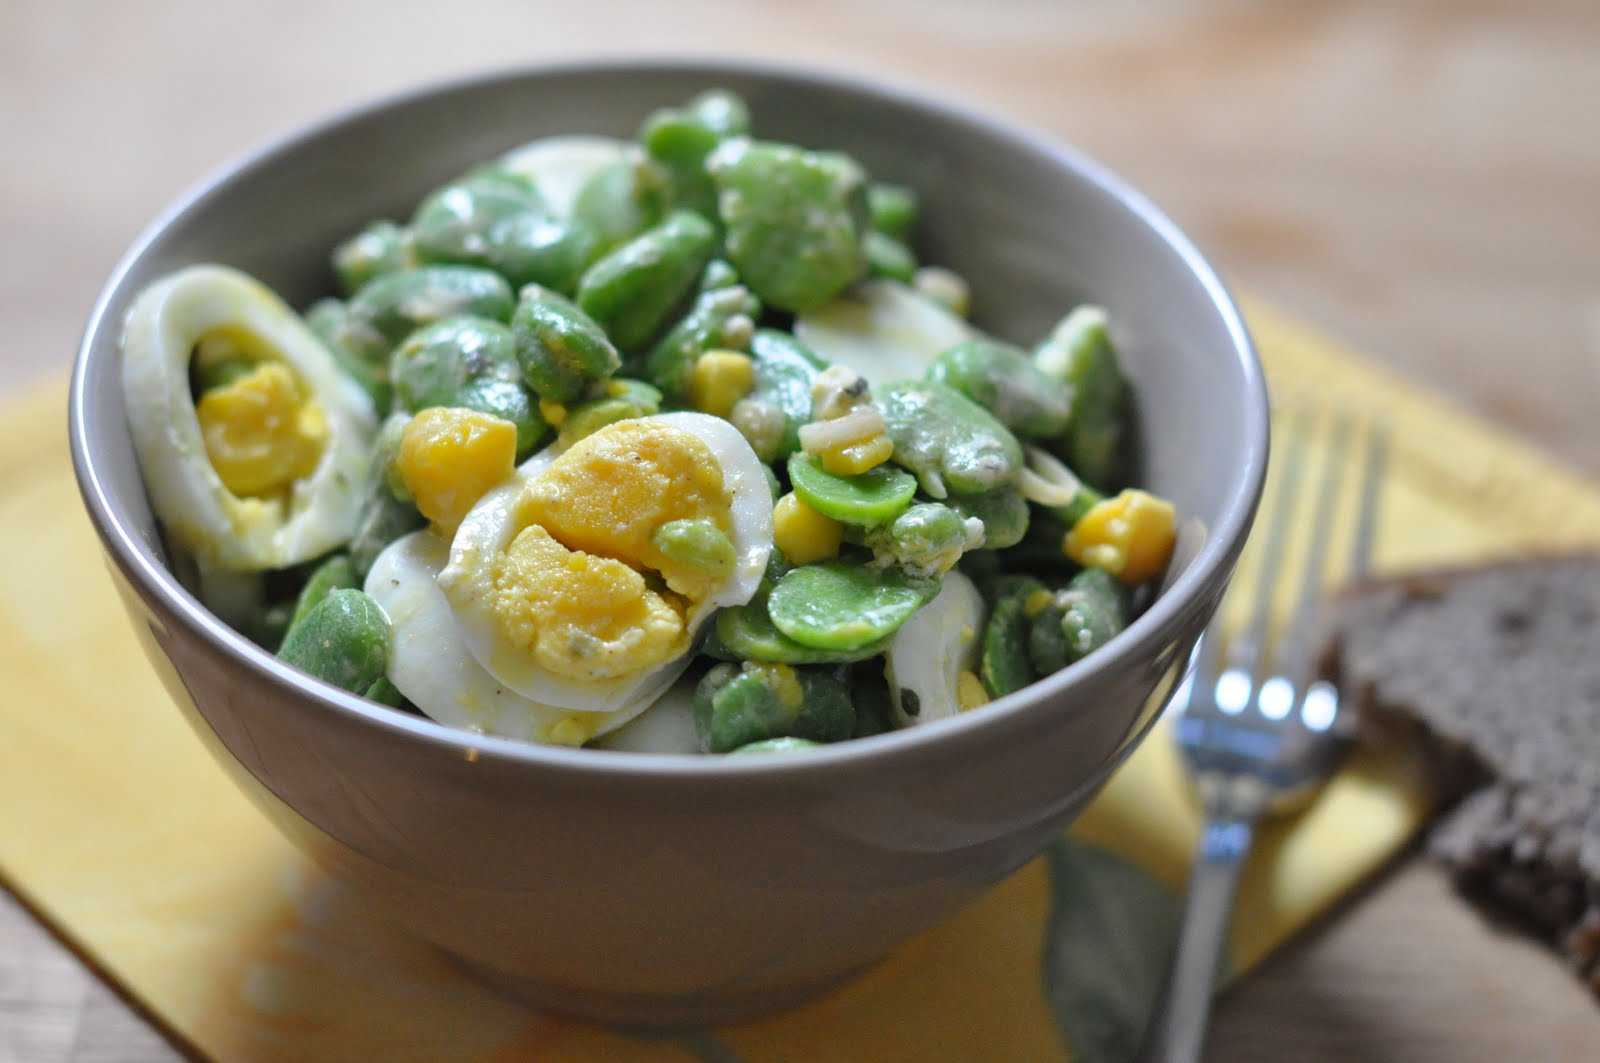
Fava bean and egg salad

As a scientist I can't help myself but weigh fava beans before and after shelling them every time they cross my path. I had blogged about the experiment here already. And yesterday as usual I took my scale out. This time we had 3 pounds of pods, 1 pound 4 ounces of beans with skin and just under 14 ounces of beans once skinned (28% of the pods' weight). We had enough for 3 generous servings.


The following recipe is inspired by this one, from Marmiton.org.
  • 3 lbs fresh fava beans (in pods)
  • 2 sprigs thyme or savory
  • 3 brown eggs
  • 3 calçot onions (or green onions)
  • 2 to 3 oz (60 to 85 g) goat cheese*
  • 1 tbsp Banyuls vinegar (or sherry vinegar)
  • 2 tbsp olive oil
  • salt and pepper
  1. Boil the eggs for 10 minutes then plunge them in cold water.
  2. Remove the dark leaves and the outer skin of the onions and slice them thinly. Place them at the bottom of a salad bowl and cover with 1 tablespoon vinegar.
  3. Shell the fava beans. Boil them with thyme (or savory) in salted water for 5 minutes, then plunge them in cold water to stop the cooking. Pop the beans out of their pale green skin. Place them in the salad bowl.
  4. Peel and slice the eggs. Add them to the salad along with the cheese, shaved or diced depending on how hard it is.
  5. Season with salt, pepper and 2 tablespoons olive oil. Toss.
  6. Serve or refrigerate.
* I used a fresh California goat cheese rolled in herbs that I had handy. I think a hard goat or sheep cheese would work even better.

Sunday, May 16, 2010

Short And Sweet Break

Our much awaited bundle of joy has arrived.Yes,my daughter gave birth to a baby boy Siddarth on May 11th.Since he is keeping his grandmom busy round the clock,I think I have to take a short break to blogging.But I will soon be back with the recipes of food items which is good for the new mom.For more details of the little star please have a look at the innovative poster made by his dad and mom.


Monday, May 3, 2010

Agretti


Here is one of the wonderful surprises of this week's CSA box. As Andrew Griffin explains in the newsletter, agretti is the Italian cousin of the American West's tumbleweed. It starts out with slender succulent leaves with "a unique marine flavor and toothsome quality". As it matures, agretti becomes, like it's American cousin, a sprawling, dry and prickly shrub, which no-one would eat!

Here is what we did, with the help of the newsletter's recipes and advice:

Serves 2
  • 1 bunch agretti, clean (we pulled the leaves from the hard branches and rinsed in cold water twice)
  • 4 slices prosciutto
  • 1 tbsp olive oil
  1. Tear the prosciutto into small pieces and pan fry until crisp. Remove from the pan and reserve.
  2. Heat up the olive oil and sauté the agretti until wilted (3 or 4 minutes are enough).
  3. Toss the agretti and prosciutto together and serve warm.
It was a little too salty for my taste (the original recipe called for pancetta) but the crunchiness of the agretti was great and the flavors really pleasant.

Pachai Kondakadalai Pirattal (Fresh Chick Peas Curry)


Another vegetable which made me curious in US is the fresh Chick peas ,right from the garden inside the pod. I found this in one of the big korean store called Lotte Plaza. I broke one pod and tasted the pea. It was tender and tasted like fresh peanut in the shell. I thought there will be at least 2 chick pea in each pod but in almost every pod there was only just one pea.

chick pea curries are always very tasty and will go well with roti, chappathi, curd rice etc.I decided to make the traditional chettinad pirattal with the chettinad masala. The curry turned out very tasty. Those who don't want the masala can make the curry adding a teaspoon of sambar powder alone
Ingredients
Chick peas-200gms(shelled out)
Big onion-1
Tomato-1

Ingredients for the Masala (optional)
coconut grated-2 table spoon
Red chili-4
Small jeera-1 teaspoon
Fennel seed-1 teaspoon
Ingredients for seasoning
Mustard seed-1 teaspoon
Fennel seed-1 teaspoon
curry leaf-little
Procedure
Take out the chick pea when you have time and store it in the fridge. Mince the onion. In the mixie or blender smash the tomato little so that it will get cooked fast. Keep the kadai in the stove.In a table spoon of cooking oil season the curry with the items given in 'To season'. Saute the onion and the smashed tomato.If you choose not to grind coconut paste, add 1 teaspoon of sambar powder( kuzhambu milagai thool)to the sauted mixture.When the sauted mixture boils add the chick peas and close the kadai. Check in between that there is enough water for the chick pea to get cooked. It will get cooked within 10 minutes.Once the chick pea is cooked soft , add the salt needed and the grinded masala.Cook in medium fire till the masala gets cooked and oil starts separating