Tuesday, August 30, 2011

Apricot Glazed Pork


Serves 2 People (Double recipe for every two people you are serving)

Ingredients:
Butterfly pork chops
Salt & Pepper to taste
Olive Oil
1/2 bag of No Yolk Noodles

For the Glaze:
3 Tablespoons of apricot preserves
1/2 teaspoon of grated fresh ginger
1/4 cup carrots finely grated
2 tablespoons soy sauce
2 cloves garlic, grated
1/2 teaspoon cinnamon
1/2 teaspoon cayenne pepper

Directions:

Bring large pot of salted water to a boil to cook noodles according to package directions. Drain noodles and set aside.

Salt and pepper pork. In a large skillet, heat olive oil over medium heat. Cook pork in skillet approximately 5 minutes on each side.

Whisk together all ingredients for the glaze over medium heat until well combined. Pour half the glaze over pork as it cooks. Reserve other half of glaze.

Serve pork over noodles. Pour remaining glaze over pork. Garnish with parsley.


Nourishing Tuscan Hummus

While living in Italy, one late summer day, I was entertaining the thought of what to serve my guests for a lunch. I so wanted to impress them with my Cannellini Bean Stew graced with the addition of Sage, a Tuscan classic. 
It was still a bit warm out though and felt serving something refreshing was in order. So I cooked my Cannellini and turned them into Hummus.


Served with fresh loaves of bread from the Panetteria; A crisp Salad of Arugula, Spinach,Tomatoes and Red Onion; an assortment of Olives and several bottles of Barbera from a local Farmer. Oh yes, I was truly living La Dolce Vita, the sweet life!


Dry Cannellini Beans
Tuscan Hummus
Ingredients:
4 Cups of Cooked Cannellini Beans
2 Cloves of Garlic
2 Lemons Juiced
1 Tbl Umeboshi Paste
1 Tbl Chickpea Miso
2 Tbl Tahini Paste
4 Tbl Olive Oil
3 Tbl Spring Water
2 Tbl of Fresh Sage
Sea Salt to taste (optional) 
Fresh Ground Black Pepper 


Fresh Sage
Method:
4 Cups of Fresh Cooked or Canned Cannellini Beans Rinsed and Drained
Puree in Food Processor with crushed Garlic, Lemon Juice, Tahini, Water, Olive Oil
Then add the Tahini, Umeboshi Paste and Chickpea Miso and Puree
Add Sea Salt (if needed) and minced Sage Leaves and Puree


 Crudités Plate
Presentation:
Spoon into a beautiful serving bowl, drizzle with your finest Extra Virgin Olive Oil and freshly ground Black Pepper 
Serve with an assortment of Olives, fresh loaves of Bread, a tray of crisp Crudités and don't forget the Vino!


Enjoy and celebrate La Dolce Vita!


Saturday, August 27, 2011

Spicy dry mushroom curry

Mushroom is one of our favorite. Here comes a south indian style dry curry. Goes well with any variety rice, sambhar rice n curd rice.


Ingredients:
1. Mushroom - 250 gms - cut into small pieces
2. Cooking oil - 4 tbs
3. Mustard seeds + urad daal (white lentil) - 1/2 tbs
4. Cumin seeds / Jeera - 1/2 tbs
5. Curry leaves - 4 nos
6. Dried red chillies - 4 nos (roughly broke into small pieces)
7. Big brown onion - 1/2 finely chopped
8. Kadalai paruppu /Splited channa daal / Splited peas - roughly 1 handful (soaked in water for 30 mins)
9.Turmeric powder - pinch
10. Coriander powder - 2 tbs (optional)
11. Red chilli powder - 1 tbs
12. Salt to taste
13. Coriander leaves for dressing
14. Grated fresh coconut - roughly one handful

Method:
1. Heat cooking oil in a pan, add mustard seeds + urad daal, once it splatters add cumin seeds, then curry leaves. After 10 sec add dried red chilli and saute for 30 sec. Now add chopped onion and cook till its transparent.
2. Drain water from soaked splited peas and add it to the onion, saute for a min. Add mushroom, turmeric powder, chilli powder, coriander powder, salt and mix well. Close the pan with a lid and cook the mushroom in medium flame. No need to add water. Mushroom ll lose moisture n that would be enough. If the gravy is too dry add 1/2 cup of water.
3. Remove the lid after 10 mins and check whether peas get cooked. Else stir and close the lid. Once peas is cooked sprinkle cilantro leaves & grated coconut, mix well and remove from flame.
Serve hot with rice/ chappathi.

Friday, August 26, 2011

Nourishing Quinoa Salad

As August is coming to an end, I cannot alleviate my desire to hang on to Summer just a bit longer. Grain Salads are a favorite at my table during the warmer seasons. So I bring you a refreshing addition to enjoy at Lunch or Dinner. This Quinoa Salad travels well to Work, School or Play and it is Gluten-Free. Consider this for your last Picnic of the Season this Labor Day Weekend!  


Quinoa Salad


Raw Quinoa
Ingredients:
1 Cup of Quinoa
4 3/4 Cups Spring Water
1 pinch of Sea Salt
2 Tbl Red Onion Diced
1 Red Onion Sliced into Fine Rounds
1 Tbl Fresh Basil, Mint,Thyme, Parsley or Cilantro
1 Cup Cucumber Small Dice
1 Cup Cherry Tomatoes Halved (optional)
I Tbl Lemon or Orange Zest
3 Tbl Olive Oil
3Tbl Umeboshi Vinegar
4 Cups of Baby Greens


Cooked and Fluffed Quinoa
Method: 
Soak Quinoa in 3 Cups of Spring Water for 20 minutes this will release the *saponin coating on the Quinoa
After 20 minutes, massage Quinoa in the soaking water and rinse several times and drain
If you choose to you can soak the Quinoa the remaining 1 3/4 Cups of Spring Water *see below 

Bring to a boil add your pinch of Sea Salt, Cover and simmer on very low flame for approximately 20 minutes
Turn off, fluff and leave covered for 5 more minutes
Remove Quinoa from the pot and place on a baking sheet to cool


Marinate the Onion Rounds in a bowl with 2 Tbl of Ume Vinegar for 20 minutes
Rinse onions and place on an impeccably clean Tea Towel to drain
The additional Tbl of Ume Vinegar will be reserved for the salad dressing


Once the Quinoa has reached room temperature, place in a Large Bowl and add:
Diced Onion, Herbs, Cherry Tomatoes, Lemon or Orange Zest,Olive Oil and Ume Vinegar
TOSS GENTLY and let sit for 15 Minutes in Fridge 


Presentation: 
Choose a pretty shaped Cup or Glass, fill with Quinoa Salad and gently pat down to secure shape for unmolding
Unmold onto a Bed of Baby Greens
Garnish with a pile of marinated Red Onions


Quinoa (“KEEN-wah”) grains or seeds have a saponin coating in nature. This coating is a natural defense for the plant from birds eating the seeds. The saponin creates a bitter taste that the birds hate, and most people do as well. Further, the soapiness of saponin acts as a laxative when eaten. So an important step to preparing Quinoa is removing the saponin coating by washing or rinsing.

Another step in preparing Quinoa considered important by many is soaking before cooking Quinoa. This step that is easily overlooked is important in two ways. First, it softens the grains aiding in digestion, enough so that many people just wash and soak, then use uncooked Quinoa on salads or snacks.
The second reason for soaking is a little harder to see. Quinoa will actually germinate in two to four hours, when the seed opens from germinating, the amino acids or proteins are unlocked, causing Quinoa nutrition to multiply. Just how much of a boost can vary from lot to lot and year by year. But it is a good boost to the proteins for such a simple step.
A not so important benefit to soaking is apparent to some people with sensitive pallets. The soaking unlocks some of the flavor of Quinoa as well.
Studies show that people who eat at least three servings of whole grains a day have a lower risk of heart disease, diabetes, and cancer. They also seem to maintain a healthy weight more easily. If you would like to try a different grain from Wheat, Barley, Oats, and Brown Rice, consider protein rich quinoa. This grain is so mild-flavored and versatile, you'll find it very easy to incorporate Quinoa into many of your recipes. 


Enjoy!


Tuesday, August 23, 2011

Date Night Chicken


Chicken Thighs 
Olive oil
Salt & pepper
1/2 large onions sliced
1 green pepper sliced
1 cup chicken stock
1/2 cup white wine
1 can diced tomatoes 
lemon pepper
thyme
rosemary
parsley to garnish
1 box cous cous 
Salt and pepper chicken. Brown chicken in large pot over medium high heat for 7 minutes on each side and set chicken aside. Add 2 tablespoons of olive oil to pan. Lower heat to medium and add in onions, peppers and garlic. 
Add in chicken stock, wine and scrape brown bits off bottom of the pan, cooking for another 7 minutes. Add in tomatoes and let simmer for 5 minutes. Add in thyme, rosemary and lemon pepper. Place chicken back in pot, turn the heat up to medium high heat, and cook for twenty to 25 minutes.
Bring a small pot of salted water to a boil and cook cous cous according to package directions.
Serve chicken over cous cous. Garnish with parsley.

Sunday, August 21, 2011

Nourishing Blanched Salad

A blanched salad is a combination of vegetables that are crisp with upward rising energy. During the blanching process the vegetables turn bright colors, due to the water soluble vitamins B and C coming to the surface. Please vary your salad with seasonal vegetables and enjoy it several time a week. Serve this with your favorite dressing or try it with the Orange Umeboshi dressing recipe listed below.


Vegetables waiting to be washed 
Ingredients: 
4 Cups Spring water
1 Cup Summer Squash Cut in 1/2 inch Diagonals
1 Cup Broccoli cut into Florets
1 Cup Leeks sliced in 1 inch Diagonals 
1 Cup of Radishes cut in Halves

Method:
Fill saucepan with Water and bring to a boil
Add Summer Squash and cook for 1 Minute, remove with slotted spoon or Mesh strainer and place on a plate 
Add Broccoli Florets and cook for 2 Minutes, remove with slotted spoon or Mesh strainer and place on a plate to cool
Add Leeks and cook for 1Minutes, remove with slotted spoon or Mesh strainer and place on a plate to cool
Add 1 Tbl of Umeboshi Vinegar to water, bring back to a boil 
Add Radishes and cook for 3 Minutes, remove with slotted spoon or Mesh strainer and place on a plate to cool


Suribachi with Surikogi
Orange Umeboshi Dressing

Ingredients:
2 Oranges
1 Umeboshi Plum 
1 Scallion


 Umeboshi Plums

Method:
Juice the oranges and place in a Blender or Suribachi
Add Umeboshi Plum
Blend or Grind by hand with a Surikogi in your Suribachi 
Once blended add finely sliced Scallion and serve with the Boiled Salad

Optional: You may add a tsp of Toasted Sesame Oil to the dressing during the blending process


Black Sesame Seeds

Presentation:
Place cooled Vegetables in a Bowl and Toss with Dressing and garnish with Black Sesame Seeds


Enjoy!


Thursday, August 18, 2011

I am back....

I was busy in shifting my house from Bangalore to Brussels, Belgium on new assignment. I will be blogging regularly soon.

Thanks for all the readers.

Wednesday, August 17, 2011

Homemade Fruit & Veggie Muffins


I cup shredded carrots
2 cups flour
1 small box of raisins
1 tsp. baking powder
3/4 tsp. baking soda
1 tsp. ground cinnamon
1 tsp. ginger grated
1/2 tsp. salt
3/4 cup oil
1/3 cup sugar
2 eggs
1 8 oz. can crushed pineapple drained

Whisk flour, baking soda, baking powder, cinnamon, ginger and salt. In separate bowl, whisk eggs, sugar and oil. Mix in carrots, raisins and pineapple. Gradually stir in dry ingredients until well combined. Spoon into muffin cups. Bake at 350 for 25 minutes for regular sized muffins, 15 minutes for mini muffins.


Tuesday, August 16, 2011

A Nourishing Macrobiotic Breakfast

A traditional Macrobiotic Breakfast will include but not be limited to: Miso Soup, Grain Porridge and Greens

Miso Soup
Ingredients:
2 cups spring or filtered water
1 inch strip of wakame, soaked in cold water for 5-10 minutes
2 inches of Daikon, cut into thin Half Moons
1/4 cup of Leek sliced into thin Diagonals
1 to 2 tsp South River Barley Miso1/4cup of Tofu cut into small cubes (optional)
1/8 cup of Scallions thinly sliced

Directions:
Soak wakame by covering with cold water for 5-10 minutes.
Place soup pot on stove with water and bring to a boil.
Remove Wakame from soaking water, cut into 1/2 inch squares
Add to soup pot and simmer for 1 Minute
Add Daikon simmer for 2 Minutes

Add the leeks and Tofu simmer for 1 more minute
Dilute miso into a small amount of soup stock, mixing in bowl until smooth
Turn off heat and add diluted miso just before serving 
Miso should be heated all the way through but not boiled, as boiling will destroy beneficial bacteria and enzymes
*Garnish with thinly sliced Scallions


Grain Porridge
Ingredients:
1 cup precooked organic short or medium grain Brown Rice
Other choices could be Cooked Barley, Millet, Whole Oats
2 cups water
Vegetables: Winter Squash, Celery, Daikon, Corn (optional)

Directions:
Place the cooked rice in a sauce pan. 
Pour water in the pot 
If you are adding the Vegetables place them in the pot add Rice and Water 
Cover and bring to a boil. Reduce flame and simmer for 15 to 20 minutes until creamy. 
*Garnish with Toasted Sesame, Pumpkin or Sunflower Seed

Greens
Ingredients:
Leafy Greens of choice: Boc Choy, Kale, Collards, Leeks, Broccoli

Method:
Steamed, Blanched or Water Saute for a few minutes. You want your Greens to be crisp and bright. From the energetic stand point, we eat greens in the morning because they are upward growing and this is exactly the type of energy we need to get up and go. Greens will also add lightness to your meal.


Next time a balanced Macrobiotic Lunch !

"Anelletti al forno", our scrumptious baked Sicilian pasta

 
Do you know what "anelletti al forno" are? Here in Sicily we have a typical shape of pasta that is called "Sicilian anelletti" which means little rings. We normally use them when we want to prepare our traditional baked pasta! 
You may find this little timballo of pasta in bars and diners in Palermo that goes with the most classic Sicilian ragout made of minced meat, tomato sauce, onions and pieces of vegetables like carrots and peas.

As this recipe is usually very rich we normally eat it in winter, while for summer we have a different version, considered absolutely "lighter" :-)
It is made of tomato sauce, fried eggplants or aubergines and Sicilian primosale cheese.

My family and I love this version of baked anelletti a lot more than the one with meat and we also add another ingredient: thin slices of Napoli salami, while other people prefer to add ham. 

This preparation takes a while (about 3 hours plus baking time), but the result is a scrumptious mouthwatering baked pasta that we normally have for the most important summer festivity: August the 15th, which is called Ferragosto (mid August term) but it is also a Catholic festivity that celebrates the Assumption of Our Lady, the Virgin Mary.
Baked pasta is something you do in layers, so read and follow the recipe carefully.

Ingredients and preparation for about 6 people:

600 gr. anelletti
2 aubergines or eggplants
200 gr. Napoli salami
250 gr. Sicilian primosale cheese
100 gr. Grated Sicilian caciocavallo cheese
1 bottle tomato sauce (about 750 ml)

breadcrumb
olive oil

1. First turn on the heat and put on a big pot for cooking the pasta. In the meantime 2. cut the eggplants in slices, not too thin, place them on a colander with salt on and leave them aside for about 15 minutes. It will make them release the bitterness and taste sweeter. After the time has passed just wash them under running water and they are ready to be fried in olive oil.

3. By the time you have finished frying, water in the pot will be boiling, so cook the anelletti as normal pasta, putting some salt in the water. They need about 20 minutes of cooking. 4. Stir the anelletti from time to time and prepare the tomato sauce in an appropriate sauce pan. 5. Cut the primosale cheese in slices or thin pieces and also the salami (you can either leave it in slices or cut it into pieces as well).


6. When the pasta is cooked (but careful not to overcooked it because it has to go in the oven as well!), drain it and add the tomato sauce plus the grated caciocavallo cheese.

Now it's time to start building the layers:
7. Take a large oven dish or tray with high rims and cover the space with some olive oil first, and breadcrumbs after, then put half the amount of anelletti mixed with tomato sauce and grated caciocavallo cheese on the bottom of the tin, then cover with a layer of fried eggplants, then primosale cheese and finally the third one with salami, just as shown in the picture below.


8. Put the rest of anelletti on top and finally cover with some more spoons of tomato sauce to avoid the pasta becoming too dry in the oven, then a drizzle of olive oil and a bit of breadcrumbs again to make the crust in the oven.
9. Bake for about 35 minutes or a little more, until it is golden and crusty.
10. Serve hot! On the right the final picture of how the whole thing should look before the baking phase. This is one of the best first dishes of all times... enjoy it!!!

Thursday, August 11, 2011

Have a rest with a "Sicilian granita"


Hi everyone, do you know what the "granita di pistacchi" is? Granita is something very typical from Sicily and is basically what you probably call a shaved ice or similar. Nice, cool, refreshing, perfect when the sun is hot and you want to have a rest.

In the southern part of Sicily the granita is particularly good and they prepare it with so many different flavors: pistaches, figs, coffee, watermelon, mint, ecc... besides the most classic one that is made with lemon.

Thanks to the picture that my two friends Laura e Carlo sent me while they were visiting the town of Ragusa. If you are in that part of Sicily, or near Siracusa as well, don't forget to try one of this excellent granite!!!
Everyone is on holiday right now so I want to wish Happy Ferragosto (ferragosto is our Summer festivity: August 15th) and enjoy your Summer vacation wherever you are!

Wednesday, August 10, 2011

Plum cake


My pear cake recipe (here) works well with other fruits. Tonight, my daughter and I made a plum version of this cake with the following proportions:

  • 5 ripe plums

  • 4 eggs

  • 180g (less than 1 cup) sugar

  • 1 stick (114g) butter

  • 170g (about 1 1/3 cups) flour

  • 1 tsp baking powder

  • 1 tsp vanilla extract

  • 1/2 tsp ground cinnamon


We beat the eggs and sugar until foamy. We added the melted butter, then the sifted flour, then the baking powder, vanilla extract, and cinnamon, mixing well (with a whisk) while adding each ingredient.
We poured the dough in a buttered, round metal pan (the same old 10" x 2" I used in the pear cake recipe).
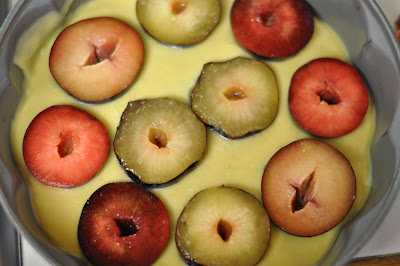
We placed the plums, halved and pitted, on the dough, cut side up.
We baked for about 50 minutes in a  340ºF oven.

Nourishing Fruit Compote

Berry season has been in full bloom here in Vermont so the other evening I decided to serve my guests a Fresh Fruit Compote of assorted Berries and luscious Pennsylvania Peaches. 


I simply washed the Blueberries, Strawberries, Blackberries and Peaches. Removed the pit from the Peaches, sliced them and tossed them together with the Berries for a quick and easy Dessert. 

Fresh Fruit Compote
Ingredients:
1 cup of each, Strawberries, Blueberries, Blackberries, 
4 Cups of Sliced Peaches
1 Tbl of Agave, 
1 Tbl of Water 
1 Tsp of Orange Flower Water 
1/2 tsp of Vanilla Extract

Method:
Wash the Blueberries, Strawberries, Blackberries and Peaches 
Removed the pit from the Peaches and sliced into half moons
Place all the Fruit in a Large Glass Bowl 
In a Small Bowl add  the Agave, Water Orange Flower Water and Vanilla Extract 
Toss together to coat Fruit with Marinade 

I prepared this right before my guests arrived and let it marinade in the Refrigerator till serving time!


Cashew Cream:
Ingredients:
1 cup Cashews, 2/3 cup Water, 2Tbl Agave Nectar, 1 tsp of Vanilla Extract

Method:
Soak Cashews for 4 to 8 Hours, drain and puree in Food Processor or Vitamix (which is what I used with) 2/3 cup of water, and the addition of the Agave Nectar and Vanilla Extract


The Fruit Compote was served after Dinner with a large dollop of Cashew Cream. It was quite Simple, Refreshing, and Nourishing!