Monday, May 16, 2011

Poze prin Toronto si o schimbare pe blog (Toronto photos and a change on my blog)


Please scroll down for English version


        Pentru ca primavara (anotimpul schimbarii) incearca din rasputeri sa se faca simtita aici in Toronto si pentru ca de curand am implinit 3 luni de bloggerit (happy me), am zis ca e nevoie de o schimbare pe blog (bine, mai multe trebuie stiu, fiti ingaduitori :)). Blogul acesta inseamna foarte mult pentru mine, am realizat cat de mult cand Blogger a avut problemele de maintenance de curand, nu pot sa va zic cum am intrat in panica (nu ca as pierde postari, ca salvez intotdeauna fiecare post) dar pentru ca nu puteam sa "intru in casa mea" vorba aia :) Ma bucura foarte tare sa vad cata lume ma viziteaza si de aceea m-am gandit sa fac tot posibilul sa va fac sa va simtiti bine cand veniti la mine pe blog.
      Atunci cand am inceput sa scriu pe aici, am hotarat ca blogul sa fie bilingv romana-engleza, pentru ca vizitatorii mei sa poata avea acces la retetele mele, fara prea multe batai de cap. Pana acum am postat traducerea la sfarsitul postarilor,  dar incepand cu postul urmator, voi face traducerea treptat, pe etape. Stiu ca va fi util pentru cei care nu inteleg romana sa vada textul corelat cu poza respectiva, plus ca imi va fi si mie mai usor sa postez. Daca aveti pareri sau sfaturi in legatura cu acest lucru, astept cu drag comentariile voastre.
      Ei, si acum sa va arat cateva poze din zona in care locuiesc eu, poze primaveratice cam de acum o saptamana, cand era caldut si soare afara, si credeam ca in sfarsit vine incet si vara...cum acum e innorat in Toronto si destul de frig, vreau sa ajut si eu putin soarele sa-si faca aparitia :)

Eu locuiesc in centrul orasului, intersectia Yonge & Eglinton, una dintre cele mai frumoase zone din Toronto (iubesc zumzetul orasului, trebuie sa recunosc)


Putin mai la nord pe Yonge street, cea mai lunga strada din lume...era duminica dupa-masa, plin de lume pe afara :) abia astept sa vina vara!


Am facut o plimbare si printre case putin...


Pe aici vezi veverite la tot pasul pe langa case, sunt foarte prietenoase :)


Si ne-am indreptat spre parcul din apropiere, o vreme splendida pentru bicicleta :) (ce dulce e baietelul!)


Unii erau la o partida de baseball, un sport foarte apreciat pe aici :)


Si dupa ce am stat si am vizionat putin, ne-am indreptat usor spre casa, admirand cerul senin si crengile copacilor inflorite! Vreau sa vina vara!!!


English version


       Because spring (season of change) is really trying to fight with the cold here in Toronto and because my blog has  recently turned 3 months, I've noticed that I need to make a change (ok, I need more than one, but be patient with me :)). This blog means a lot to me, and I didn't know how much until Blogger had maintenance issues recently, I can't begin to tell you how I panicked (not that I would loose any posts, cause I always save everything) but because I couldn't "get home" if you know what I mean :) It makes me really happy to see how many people visit me and my blog and that's why I wanted to do everything possible for you to feel welcomed here.
       When I started to blog, I wanted my blog to be bilingual, so that my visitors could have access to my recipes without too many headaches. Until now, I've placed the translation at the end of the post, but starting with my next post, I'll be translating each phrase step by step. I know it'll be a lot easier for those of you who don't understand Romanian, to see the text matched with the photo, plus it's easier for me as well. If you have any ideas or suggestions related to this change, please feel free to leave a comment, I'll be happy to see what you think :)

      And now, let me show you some pictures from the area I live in , spring pictures which were taken like a week ago, when it was sunny and warm outside, and I actually thought that summer is coming soon...now it's cloudy and pretty cold in Toronto, so I want to help the sun show up :)
      
  I live in the center of Toronto, Yonge & Eglinton intersection, one of the most beautiful areas in the city (I love the city buzz, I'm a true city-girl :))

A little bit more north on Yonge street, the longest street in the world!  It was a Sunday afternoon, and the street was pretty crowded, oh, I'm so waiting for the summer!!!

We took a walk between the houses from the neighborhood...

Here you can see squirrels everywhere, they're very friendly :)

And we went to the closest park, the weather was gorgeous, perfect for bicycling :)

Some people were playing baseball, a very appreciated sport around here...

After we watched a little, we headed back home, admiring the beautifully bloomed tree branches! Hopefully summer will be here soon!


Friday, May 13, 2011

Lemon-flavored artichokes: nice, easy and tasty


Do you know how to cook artichokes with a delicate lemon flavor? A couple of weeks ago I made this delicious side-dish that is perfect for dinner to accompany a frittata or a pie.

Ingredients & preparation for 4 people:
4 artichokes - 2 lemons (both juice & zest) - olive oil - salt - water

You have to clean the artichokes as usual: take an artichoke at a time and remove the external and rough leaves using a sharp knife. Continue until you have only thinner and softer leaves. Cut also the stem. In a sink full of cold water squeeze the juice of half a lemon and leave there the lemon as well. When you have finished with the knife leave the artichokes to soak about half an hour. 

Cut the artichokes very thinly. Put a frying pan on a medium heat with a drizzle of oil, salt and a glass of water and cook there the artichokes stirring them from time to time to avoid sticking on the pan. Grate some lemon zest too.

Once they are cooked squeeze the juice of at least half a lemon and let cook all together 10-15 more minutes. You may serve them hot or warm... enjoy!


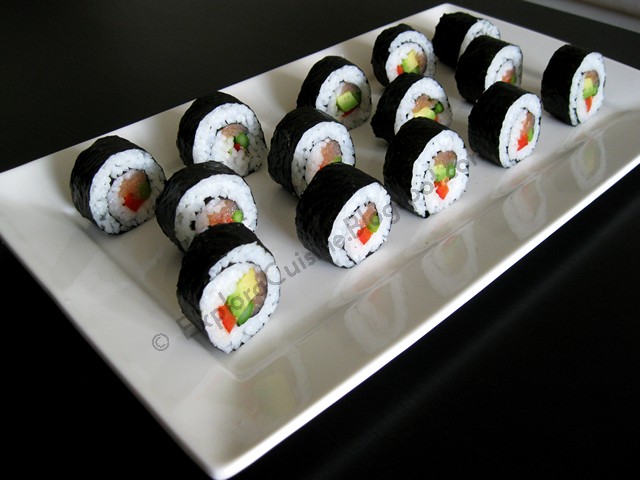
Maki Sushi cu sparanghel, avocado si somon afumat (Smoked salmon, Avocado and Asparagus Maki Sushi)


      Sushi este un fel de mancare de origine japoneza compus din orez preparat cu otet si alte ingrediente. Exista multe tipuri de a-l prepara, dar toate au la baza orezul pentru sushi. Maki sushi reprezinta rulouri de orez invelite in foite din alge de mare uscate numite Nori, si umplute cu diverse legume, peste crud, crab, etc....Fiind un aperitiv light, colorant si foarte apetisant, este preferat de foarte multa lume.
      Pentru ca am vrut sa postez si o reteta mai interesanta pentru Sparanghel, unul din ingredientele provocarii  lunii mai "Dulce Romanie", am ales reteta de maki sushi utilizand avocado, ardei, sparanghel si file de somon afumat, caci nu sunt mare fan al  pestelui crud :) Credeam ca modul de preparare este dificil, dar cand am ajuns pe terminate, pot sa zic ca era deja distractiv, plus ca poti deveni extrem de creativ in privinta ingredientelor. Fiind prima data ca le fac, nu m-am abatut de la ce mi-am propus, dar pe viitor, am gasit deja multe alte modele ce vreau sa le incerc. Sper sa va ajute pozele step-by-step, e tare simplu de facut si efectul e garantat :)
Pentru reteta de mai jos, m-am inspirat de aici si particip cu ea la YBR pentru luna Mai organizat de Nancy de la SpicieFoodie, care apropo are niste retete grozave, neaparat sa o vizitati!
      Sushi represents a Japanese food consisting of cooked vinegared rice and other ingredients. There are multiple ways of preparing it, but they all have in common the sushi rice. Maki sushi represents sushi rolls covered in seaweed sheets named "Nori", and filled with different vegetables, raw fish, seafood, etc...
     Because I wanted to post a more interesting recipe as well that called for Asparagus, one of my 2 ingredients chosen for "Sweet Romania" challenge, I've chosen to make Maki Sushi with smoked salmon (I don't like raw fish), peppers, asparagus and avocado. I thought that rolling these would be difficult, but it turns out that it was pretty fun to make, plus you can get very creative when using fillings for the rolls. Since it was my first time making these, I followed my plan and didn't use other combinations besides the one I had in mind, but I will make different types in the future, I already found other beautiful ways of making them :)
I hope my step by step pictures will help, they're really very simple to make and they have a great effect on people :)
I'm participating with this recipe at May's YBR, organised by Nancy from SpicieFoodie, which is a terrific blog and I strongly recommend you pay her a visit, you won't be sorry!


Ingrediente/Ingredients:   

  1 "covoras" de bamboo/1 bamboo mat
  300 g orez pentru sushi (cu bob mic sau mediu)/300 g sushi rice
  2 linguri otet de orez/2 tablespoons with rice vinegar
  1 lingura zahar/1 tablespoon with sugar
  1/2 lingurita sare/1/2 teaspoon with salt
  4 Nori sheets (alge/seawood)
  4 fire sparanghel/4 Asparagus strips
  100 g file de somon afumat/100 g smoked salmon
  1 avocado/1 avocado
  1 ardei rosu (optional)/1 red pepper
  sos de soia/soya sauce
  seminte de susan (optional, eu am uitat sa pun)/sesame seeds (optional)

Cum se face/How it's made:


Mai intai ne ocupam de orez.
We first make the rice:


Spalam orezul in mai multe ape, de vreo 4 ori, pana cand apa ramane curata.
Punem orezul la fiert la foc mare intr-o oala cu apa, cat sa-l depasesca cu vreo 2 cm. Cand orezul incepe sa fiarba, dam focul mic, acoperim cu capac oala si lasam sa fiarba inca 8 minute, fara a ridica capacul de pe oala.(orezul va absorbi toata apa).
Dam deoparte orezul si mai lasam inca 10 minute. Dupa 10 minute, il transferam intr-un alt vas, si il acoperim pana cand preparam otetul sau "Sushizu".
We wash the rice very well (4 or 5 times).
In a large pot we place the rice with water, just 2 cm above the rice, and we place the pot on high heat.
When the rice starts to boil, we reduce the heat to Low, we cover and let it boil for 8 minutes (do not take the lid off).
We remove the pot from the heat and we let it steam for another 10 minutes covered.
We transfer the rice to another bowl and we cover it until we prepare the vinegar: "Sushizu"


Amestecam cele 2 linguri de otet cu 1 lingura de zahar si cu sarea si le punem pe foc sa se incalzeasca bine (fara a fierbe!). Luam de pe foc si lasam sa se raceasca. Cand s-a racit, amestecam cu orezul usor, cu o lingura de lemn, fara a zdrobi orezul si acoperim cu un capac pana terminam cu umplutura.
Curatam si fierbem sparanghelul 3 minute in apa cu sare, dupa care dam sub jet de apa rece, pentru a-i pastra culoarea si fragezimea.
Ardeiul il taiem bastonase, la fel ca avocado, iar somonul il taiem fasii subtiri.
In a small pot, we pour the vinegar, we add the sugar and salt and we stir very well until they warm up, but not boil. We set aside. When the vinegar is cold, we mix it with the rice, mixing it gently with a wooden spoon.
We start preparing the filling by boiling the asparagus for 3 minutes, and placing it after that in cold water, not to loose the color and freshness.
We cut the pepper in thin strips, as well as the avocado and smoked salmon.

Ne pregatim de asamblare:
Asezam covorasul de bamboo pe masa (eu nu am gasit de cumparat langa mine si am folosit ce aveam, de altfel foarte bun), iar peste el, asezam o foaie de alga cu fata lucioasa in jos cu grija, caci sunt foarte fragile.
On the bamboo pad, we place one Nori sheet with the shiny side facing down.(I couldn't find a bamboo mat near me so I used what I had)


Peste alga punem orez in strat potrivit de gros, apasandu-l usor si lasand o margine de 2 cm libera in partea de sus si cea de jos.(pe lateral va fi complet acoperita alga). Orezul va fi foarte lipicios, asa ca trebuie sa va udati cu apa pe maini tot timpul pentru a-l putea manevra.
With wet hands we add one layer of rice, we cover the sheet from side to side, leaving a 2 cm space on top and bottom of the sheet. We press the rice until we get a even layer. The rice will stick to your hands so make sure you wet your hands all the time.


In marginea de jos, aproape de noi, asezam somonul, sparanghelul, bastonas de ardei si avocado, toate fiind puse in fata orezului.
We place the asparagus, smoked salmon strips, peppers and avocado on the bottom, in front of the rice.


Cu mare grija, incepem sa rulam alga cu legumele peste orez cu mana, si ajutandu-ne de covoras presam usor ruloul treptat pentru a se lipi bine orezul, (am intors covorasul ca sa se vada din fata cum rulez alga)
With our hands we gently roll the sheet with the vegetables, until it reaches the rice, and we help our selves with the bamboo pad, to roll it forward, gently squeezing and pressing the sushi roll, so the rice sticks very well.


Cand ajungeti la capatul algei, umeziti cu putina apa alga pe orizontala pentru a se lipi mai bine alga si mai strangeti putin ruloul prin covoras pentru a va asigura ca ruloul s-a inchis la capete. Et voilà! (mi-au iesit 4 rulouri in total)
When we reach the end, we wet the horizontal end of the seaweed sheet so it sticks better and closes the roll more secure. Make sure that the ends are sealed.
We squeeze some more the sushi roll with the bamboo pad and we set aside. Et Voila! (I made 4 rolls)


Cu un cutit umezit in apa, taiati rulourile bucati mai mici (eu le-am taiat mici ca sa poata fi mancate usor dintr-o imbucatura).
With a wet knife, we cut the rolls in smaller pieces (I prefer them small, for a one bite meal).


 Si din alt unghi bucatelele apetisante :)
From another angle :)


Mai de aproape...
Closer...

                                          
 Serviti Maki Sushi cu sos de soia si pasta wasabi, daca va place, eu am renuntat la pasta. Bon appetit!
We serve Maki Sushi with soya sauce and Wasabi paste, if you like it, I only wanted the soya sauce.
Bon appetit!


Wednesday, May 11, 2011

Tricolor kurma / Tricolor coconut gravy

 Simple vegetarian kurma. Goes well with hot rice and chappathis.

Ingredients:
  1. Chopped carrot, peeled & chopped potato, green peas - each 1 cup
  2. Cooking oil - 4 tbs
  3. Mustard seeds + urad dal - 1 tbs
  4. Curry leaves
  5. Onion & tomato - each 1 finely chopped
  6. Turmeric powder - 1/4 tbs
  7. Salt to taste
  8. Edible coconut oil - 3 tbs
To grind:
Fresh grated coconut - 1/4 cup
Green chillies - 4 nos
Fennel seeds - 1/4 tbs
Garlic pods - 3 nos

Method:
  • Boil and cook veggies with enough water in a pressure cooker / a wide pan till they turn tender. Keep it aside.
  • Heat cooking oil in a pan, add mustard seeds, urad dal, curry leaves.
  • Add onion, tomato, turmeric powder + salt and saute till tomato is cooked.
  • Now add the veggies and mix well. After 2 - 3 minutes add the ground paste and cook for 5 mins.
  • Switchoff the stove n garnish with chopped cilantro & coconut oil.

Sparanghel fript cu sos de iaurt si usturoi (Roasted Asparagus with Yogurt Garlic Sauce)


Please scroll down for English version


       Unul dintre ingredientele alese de mine pentru Provocarea lunii Mai "Dulce Romanie" este Sparanghelul, o leguma minunata de sezon, pe care sa fiu sincera nu o folosesc prea des in retetele mele, de aceea mi s-a parut perfect pentru provocare, astfel urmand sa vedem mai multe modalitati de a-l prepara.
       Pentru ca am vrut sa pastrez pe cat de mult posibil aroma sparanghelului, am incercat o reteta simpla cu un sos minunat care sa acompanieze fragezimea acestei legume (Reteta am vazut-o in revista Chatelaine). E gata in 15 minute si merge foarte bine langa o fripturica :)

Ingrediente:  

   500 g sparanghel
   250 g iaurt simplu
   3 linguri ulei de masline (presat la rece)
   1 catel usturoi
   putin patrunjel verde
   sare, piper


Cum se face:  

Mai intai spalam sparanghelul.


Rupem capetele lemnoase de la baza si le curatam de coaja subtire (daca sunt mai groase)


Asezam sparanghelul intr-o tava, presaram peste el o lingura de ulei, sare, piper, si intoarcem sparanghelul pe toate partile sa se acopere bine.


Dam la cuptorul preincalzit la 200 de grade pentru 10-15 minute, in functie de grosimea legumelor.(nu trebuie sa fie moale)
Intre timp facem sosul: punem intr-un bol iaurtul cu usturoiul zdrobit, uleiul de masline, sarea si piperul.


Adaugam patrunjelul verde tocat, amestecam bine si dam deoparte.


Eu intre timp am pus si o bucata de carne in tigaia grill, sa servim langa sparaghel :)


Servim sparanghelul simplu cu sos de iaurt (pentru cei ce tin dieta)


E super gustos, fraged pe interior si usor crocant pe exterior :)


 Din alt unghi...


Langa friptura...Bon appetit si astept in continuare retetele voastre pentru provocare :)


English version


       Asparagus is one of the 2 ingredients I've chosen for May's "Sweet Romania" Challenge", a wonderful season vegetable, which to be honest I don't use that often in my recipes, that's why I thought it would be perfect for the challenge, that way we can see different dishes with it.
       Because I wanted to preserve the flavour of asparagus original as possible, I've prepared it using a very simple recipe, with a delightful sauce that would only complement the vegetable (I saw the recipe in Chatelaine). It's ready in 15 minutes and goes very well with steak :)


Ingredients:    

   500 g asparagus (a bunch)
   250 g plain yogurt
   3 tablespoons olive oil (cold pressed is great)    
   1 garlic clove
   some fresh green parsley
   salt, pepper
                           
How it's made:    

We first wash the asparagus.
We snap off tough ends and peel the base if it's thick.
We place the asparagus in a roasting pan, we drizzle with 1 tablespoon of oil, we sprinkle salt and pepper and we toss very well to coat.
We place the pan in the preheated oven at 400 degrees for 10-15 minutes (depends on thickness).
Meanwhile, in a bowl we mix very well the yogurt, crushed garlic, olive oil, chopped parsley, salt and pepper.
We serve the asparagus with yogurt sauce on top.
I fried some steak in the grill pan and served with the asparagus.
Bon appetit!

I'm waiting for your recipes for this challenge!

Tuesday, May 10, 2011

Red onion and caciocavallo, the Mediterranean pie for vegetarians


Do you know how to prepare a red onion pie with caciocavallo cheese? Some years ago a lady taught me some very fast but tasty recipes to do when you are tired or you don't have ideas about what to cook. She was a working mother and had three kids, so she always had problems of time. One of the recipe is definetely this lovely scrumptious pie for those who love the delicate taste of red onion, and is perfect for vegetarians as well!


Since I learnt how to make it I have prepared it so many times and everyone in my family loves it. You need to use some shortcrust pastry as a base, so you can either make it yourself as I do, or buy it ready in supermarkets as she was suggesting.

Ingredients & preparation for 4 people: 
- shortcrust pastry - 4-5 red onions
- 80 gr matured caciocavallo cheese
- oregano
- olive oil
- salt
- 2 ts fresh creamy cheese (like Philadelphia or Robiola)


1. First of all, peel the onions carefully and cut them in thin slices.

2. On a medium heat put a drizzle of olive oil in a frying pan and sear or sautè the onion for about 15-20 minutes adjusting with salt. It has to become completely cooked but not brown in color.

 3. Once it is ready, let it cool down a bit, then add abundant oregano, the 2 tablespoons of a plain creamy cheese of your choice (that is good to give a more creamy filling).
4. Cut the matured caciocavallo in little cubes and add them as well to the onion mix.
5. Now preheat the oven at 180° C.
6. Roll out the pastry (or open the pack if you have bought it) and give it a rounded shape.
7. Place the mix inside the pastry and fold half of it on the other half, giving the shape of half-moon, being careful that the up and down parts of the pastry are well closed together.
8. Cook in the oven until it becomes golden brown (about 20-25 minutes) and serve hot with a glass of red wine.

You will definetely enjoy the contrast between the sweetness delicacy of red onion and the strong taste of the caciocavallo melt together in one delicious pie!

Sunday, May 8, 2011

Panakam / Indian energy drink

Ingredients:
Jaggery (powdered) - 1/4 cup
Tamarind paste - 1/2 tbs
Juice of 1/2 Lemon
Dry ginger powder (sukku) - 1/4 tbs
Cardomom powder - 1/4 tbs
Edible camphor - pinch (optional)
Salt a pinch

Method:
Dissolve the powdered jaggery in 1/2 cup of water.
Add all the remaining ingredients to jaggery water + 1 1/2 cups of water.
Drain the drink thru a seive for any dust. Serve chilled.

Simple Healthy drink for the hot summer. I am submitting this to Kurinji kathambham healthy summer event.